How long is a piece of string? – Budgeting for your VFX

This post aims to be a bit of a follow up to the Stick vs Carrot post I wrote a long while ago about why I don’t work for free. It presumes you are not wanting something for nothing, so if you are, or have little budget, I strongly encourage you to read Stick vs Carrot first. This post is aimed at exactly the same people, ie small industries, students/graduates wanting help with their videos, musicians wanting music video help. It is also for those who have never hired someone before to do VFX or consider all VFX to involve a green screen.

Regularly I’ll get emails saying something like, “I’ve just completed my first album and am looking to hire a VFX guy for help with my first music video. How much will it cost to add VFX to my dancers?”
Your question opens up a veritable Pandora’s Box of new questions. Much more information is needed.

In an ideal world, before you start a thing, even putting pen to paper to create a storyboard (you are creating a storyboard right?), plan out shooting, chat to VFX companies about what can and can’t be done. There are many quick, cheap solutions, but you may find some of your plans are way too adventurous. When filming with VFX in mind, rather than applying a fix-it-in-post attitude, a few pitfalls can be avoided, but also planned for. For example, many VFX are so-called invisible VFX. They don’t go bang, they don’t melt buildings into a raging torrent of water, they just sit in the background and hide things that may draw attention to themselves. Sometimes they’re even in the foreground. Period dramas are an excellent example of this. In Britain, we are lucky enough to still have many beautiful regency houses in fantastic condition, but they are often bordered by various modern paraphernalia such as electrical cables, gift shops, a nearby oilseed rape farm, a satellite dish, a Starbucks. All of this needs removing so it doesn’t feel incongruous with the regency feel of the drama. These invisible effects appear in many types of show or promo. On a small budget video they may also be invisible costs you haven’t considered. Look out for them.

When contacting VFX companies, (or especially in an effort to save cash, individual artists), check your budget. Really now, check it. If it’s really low, only a few thousand, consider how essential your chosen VFX really are. Junk things you’ve added because you saw it in The Hobbit and think it might be cool in your shaver advert. Don’t be offended if individuals like myself tell you to go away and save some cash. Add an extra contingency of about 40% on top if you can. Why? Things change. All the time. We’re all human and you may find that you don’t like the results, even if they do look thoroughly convincing. All VFX houses can provide quotes for you to assist roughly with your budgeting.

Make a storyboard. Even if it’s really rough sketches. There are guides to it online, but quick pointers are the following; an image for each shot, large arrows showing camera movement, VFX motion and direction. The more detail the better. It may seem time-consuming, but overall it will save you time and money. When chatting about VFX, refer to the boards, to scripts, to reference images, heck even full-on style guides and treatments are great. Knowing the camera you will shoot on is advantageous.

Even after all of this, there will be to-ing and fro-ing. This is natural as oddly enough it’s a creative process, but with some forward planning you’ll become a respected creative rather than one who inspires groaning upon entering a room. Take your time, plan ahead, ideally chat to VFX types before production, shoot only what you planned to, don’t move the goal posts and you’ll hit the end with minimal compromises.
Richard Hammond Builds a Planet – UK Airing

The first episode of the British cut of How to Build a Planet is to be shown this weekend at 9pm GMT on BBC One.

Information on what I did on the show is in my previous blog post.

The British cut is different to the US one. The cut shown on Sci had to be edited to allow for the ad breaks. So, if you like your Hammond unsullied, this is the showing for you! Additionally, this being the UK, Hammond appears in the title of his own show. The international cuts often drop his name so as to make them more marketable in countries where he is little known.

The second episode is likely to be broadcast a week or so later but is yet to be confirmed I think.

More info at the at the BBC

How To Build A Planet – My VFX Input

Not so long ago I worked at Lola Post, London, on another documentary hosted by Richard Hammond. Similar to the Journey to The Centre of The Planet and Bottom of The Ocean shows I worked on some time back, this entailed a heck of a lot of vfx.

The concept is that we see the constituent parts of scaled-down planets and the solar system being brought together in a large space over the Nevada desert. In order for Hammond to be able to present things at the necessary altitude, he is up at the top of a 2 mile high tower, which is obviously not real for various reasons. Nor is the desert much of the time. Or Hammond.

My input on the show was working on dust and sand particle systems. I was working on 2 sequences of shots. I will warn you now that some of this will get technical.

The first sequence shows a large swirling cloud of high-silica sand and iron. This includes a shot which was to become my baby for a month or two. It pulls out from Hammond at the top of the tower, back through the dust cloud swirling around him, then really far back so we see the entire 2km wide cloud in the context of the landscape around it. The whole shot is 30 seconds long.

The second sequence of shots shows the formation of Jupiter out of a large swirling disc of matter. Jupiter itself attracts dust inwards, which swirls as it approaches.

A few challenges presented themselves quite early on. One was creating particle systems in Softimage’s ICE that behaved correctly, especially when it came to dust orbiting Jupiter as the whole system itself swirls around the protosun. The initial swirling round the protosun was solved using a handy ICE compound that Lola have kicking about on their server, but if you use that twice in an ICE tree it is only evaluated once as it sets the velocity using an execute node, effectively overriding the new velocity value for each particle, rather than passing that out so it can be added to the previous velocity.

The solution to this was to break apart the compound. Integrating new nodes, including some out of a Move Towards Goal node, meant that I was able to make a new compound that I could proudly label Swirl Towards Goal. It sets the goal, then outputs a velocity which can be added to the velocity from the previous swirling compound higher up the tree. It even has sliders for distance falloff, swirl speed, and weight.

The most challenging aspect of this project was actually rendering. The swirling dust in each of my shots is made up of about 4 different clouds of particles. One alone has 60 million particles in it.

Enter Exocortex Fury, the fabled point renderer that was to save our bacon. Aside from one fluffy cloud pass per shot, rendered as a simple Mental Ray job on a separate lower detail cache, each cloud pass was rendered with Fury. Unlike traditional particle renderers that use CPU to render, Fury is a point renderer which can take advantage of the raw power of graphics cards. The upside is a far faster render compared to traditional methods, and done correctly it is beautiful. To speed things up further, particles which were offscreen were deleted so Fury wouldn’t consider them at all. Downsides are that it can flicker or buzz if you get the particle replication settings wrong and it has no verbose output to tell you quite how far it is through rendering. Between us dust monkeys many hours were spent waiting for Fury to do something or crash.

Adding to the complications was the scale of the main scene itself. The tower is rendered in Arnold, a renderer that works best when using one Softimage unit per metre. Unfortunately the huge scene scale caused problems elsewhere. In a couple of shots the camera is so high off the ground that mathematical rounding errors were causing the translation to wobble. Also, as particles, especially Fury-rendered ones, prefer to be in a small scene to a gigantic scene for similar mathematical reasons, they weren’t rendering correctly, if at all. The particles were in their own scenes for loading speed and memory overhead purposes, but in order to fix these issues, the whole system was 1/5 of the main scene scale and offset in such a way that it was closer to the scene origin yet would composite on top of the tower renders perfectly.

How to Build a Planet is on show in the US on Discovery’s Science channel before being shown to the UK in November.
Discovery Sci – How to Build a Planet

Why you need compositing in your 3d life

Recently I’ve been retraining in Maya and giving myself extra alone time with the Arnold renderer from Solid Angle.
I decided to use this as not only an opportunity to find out how my Softimage lighting and rendering skills translate to Maya, but to show how basic compositing is something that every 3d artist should embrace if they don’t already.

One thing which has surprised me again and again is how little students and graduates of 3d courses are given a grounding in understanding what goes into their image and why it’s beneficial to use the compositing process as part of their workflow. Some students are even penalised for not showing their raw unenhanced render, having points deducted for daring to composite. To give a parallel, this to me is like a film photography student handing in negatives and no prints. The job is half done.

This won’t be a tutorial, more a pointer in the right direction for those who are starting out.
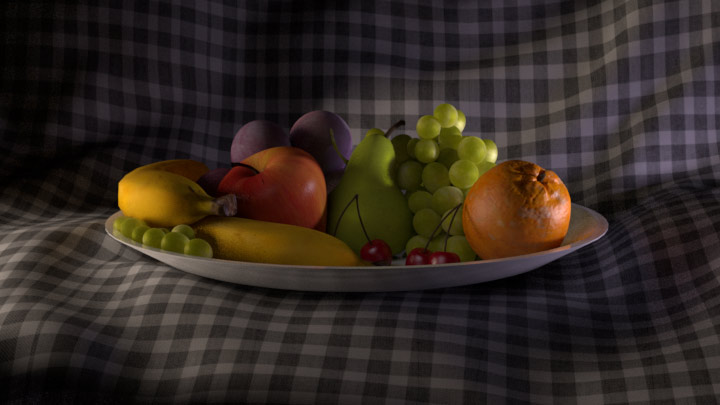
The example I use, a still life of a bowl of fruit, is a model from the very first lighting challenge hosted over at CGTalk. The files and others are downloadable at 3dRender. The model’s pretty old now so it’s not especially high detail but is still sufficient to show you what I intend to.

After a bit of setup in Maya and throwing on some pretty rough textures, here’s the beauty straight out of Arnold:

Beauty renderer

It’s lit with 3 lights; A cool exterior light, a warmer interior light, and a fill for the shadow in the middle. On their own, the images appear like this:

Lights Contact Sheet

These images can be added together in any compositing software and they will give exactly the same result as the beauty above, to the extent that a pixel on the beauty will be exactly the same colour as when these three images are added together.

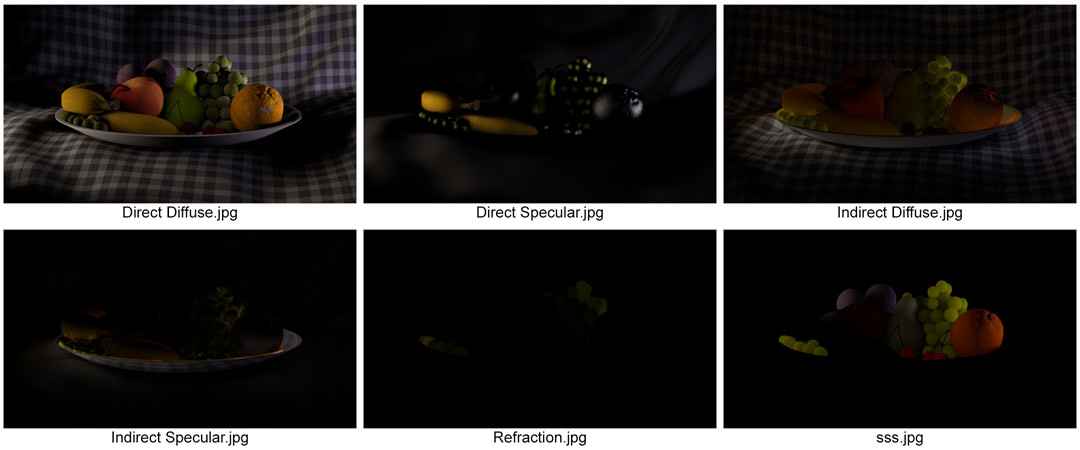
Each of these images is itself a composite image. Arnold, Mental Ray, Vray and other renderers consider many different material properties when returning the final colour for a particular pixel. Each property can be saved out as an image itself and added together to form the final image. In the case of the beauty itself, these are the images that I’ve rendered out of Arnold:

Component Images

Again, added together, these form the same image as the beauty above perfectly.

(A side note here: A few component images are missing, including reflections, but were missed out of this contact sheet as they are entirely black. As none of the materials are reflective in the traditional sense, the reflection image is returned as black, whereas the direct specular contains highlights that mimic reflections. Arnold is peculiar in that it can consider reflections in 2 ways and transparency in 2 ways, depending on what is trying to be achieved.)
 

So what am I getting at here?

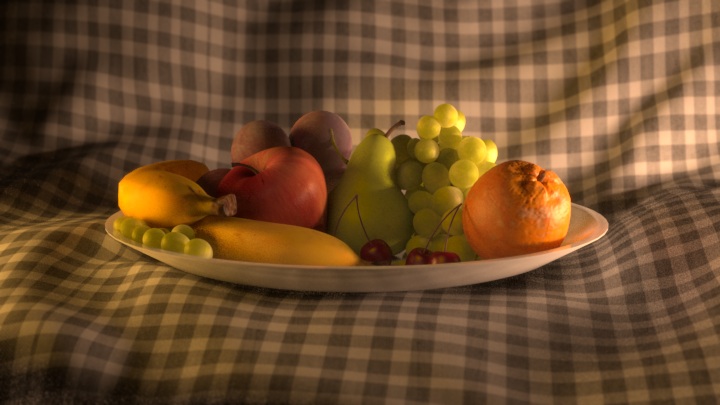
Here’s the beauty again:

Beauty renderer

Now here is a warm, evening setup:

Evening

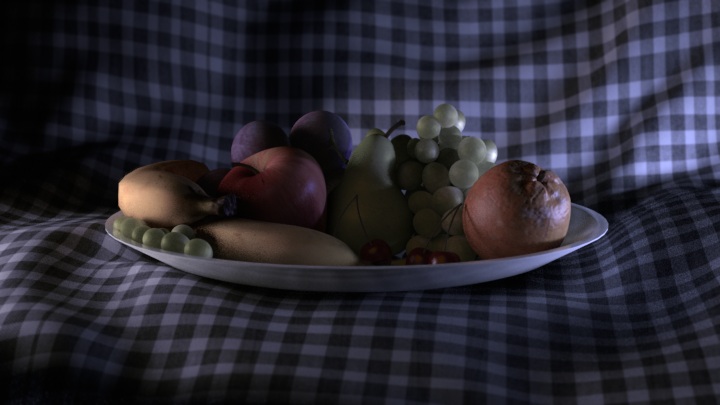
And finally, a night lighting setup:

Night

All three use the same component images, composited together in different ways: For example, tinting the lights, changing the intensity by blending the images with varying opacity, or even desaturating the key light to achieve a moonlit interior effect. On the night lighting I’ve changed the apple using a matte together with the specular & sss channels from the fill light. It was too bright and waxy. I could have re-rendered the 3d perhaps, but a tweak in Nuke was a lot more efficient.

The compositing process, even at this basic level, allows for flexibility from the get go. Where clients are concerned, flexibility is key. When passing work by a client it’s inevitable that changes will be requested and often they are something subtle that can be achieved in the composite. If you try to achieve that yourself using only 3d solutions, the render times will get long, especially when working on tv or film. Ordinarily I work alongside compositors and it’s up to them to do compositing tweaks whilst I work on a new shot or more substantial alterations to a current one.

Similarly, when first lighting a shot, working with many rendered channels, including additional ones of your own creation, is a rapid method of figuring out whether your setup is indeed heading in the right direction. Using the same component images for multiple looks is a time saver too.

One thing to bear in mind is once you know which channels are likely to be needed, it’s time to stop rendering the others as these can fill up hard drives quite nicely.

In short, stop tweaking your 3d scenes asap. Render out your initial lighting setup and see how much can be done in the comp. It isn’t cheating; It’s part of the process. It allows you to render the shot out, pass it on, and start a new one. Ultimately it will help your relationship with compositors who like to know what’s going into your image and what they need to add, plus [perhaps I shouldn’t say this, but here goes] it will make you more employable.

South Bank Show Trailer

A few months back I worked on a trailer for the South Bank Show, featuring Melvyn Bragg walking through the Leake St tunnel under Waterloo station. Bragg was shot on a greenscreen, with the environment being recreated in Softimage by myself and fellow freelancer Rasik Gorecha.

The obvious question there is why? Why can’t Mr. Bragg just go into the tunnel and we shoot it there, huh? Well, there are a few obvious answers to that. The tunnel, itself a road with access to a car wash half way down, is dank, contains certain undesirable types Mr. Bragg would probably best steer clear of, and is continually in flux thanks to it being one of the few areas in London where it is legal to graffiti. It’s also not the most comfortable of places to sit around in for long hours on a shoot. The other reason is that lots of the graffiti was to be replaced with animated posters and artwork featuring well known faces from the arts. That process is a lot easier if created digitally and lit using indirect lighting solutions.

My input on this was twofold. Firstly I set up the lighting in Arnold. After an hour or so of experimenting, the solution found was to place shadow casting point lights in the ceiling under about half of the strip light fittings, plus a spot light at either end of the tunnel. Additional fill lights were used to brighten up the nearest walls. The lights in the walls toward the back of the tunnel are merely textured models and not actual lights.

One of the things with a Global Illumination solution like Arnold is that it can lead to fizzing. One solution to lighting this tunnel would be area lights. This was ditched as a plan extraordinarily fast as it led to lots of noise, plus the modelled lights themselves act as bounce cards essentially negating the need for area lights at all.

Rasik had the majority of the modelling done by the time I joined in the project but was yet to embark on cables. Whilst he set up initial texturing, I became cable monkey. I modelled cables and brackets, trays for them to run along, pipes and all sorts. It took a few days of continually modelling cables before I’d finished them. Simple stuff but it really added to the believability.

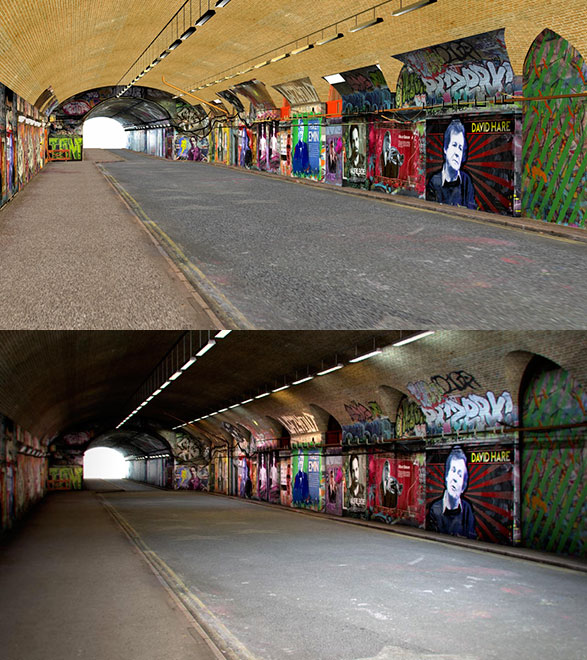
South Bank Show Trailer

The top of the two images above is the model with finished textures and below that is the finished lighting.

The final trailer is not as it appeared on Sky for 2 reasons. They added their own logo at the end, naturally enough, and they own full copyright of the sound bizarrely, so mine’s a silent movie. Add your own ragtime soundtrack as appropriate.

The Bible Series – VFX

Recently in America, The History Channel broadcast The Bible Series, knocking American Idol into the weeds for ratings. The real reason of course to celebrate this fact is that I worked on VFX for this, along with many others hired by / working at Lola Post, London.

There were hundreds of shots. As the series covers many well-known events that are either epic in scale or miraculous in nature, it’s hard to cut corners with this kind of content.

One of the advantages of VFX is the ability to extend sets or create new ones. The most used model shared amongst the 3d crew was that of Jerusalem. It was originally an off-the-shelf-model of a real scale model, intended to be seen from a distance, so it needed to be tweaked and improved upon where appropriate on a shot by shot basis. With so many artists having touched the model at one point or other, the lighting setup, materials and textures got improved to the extent that once composited, the shots really shone out. Many of the shots I did for The Bible featured Jerusalem, either as an entirely CG set or an extension tracked into existing footage.

One story that is covered in the show is that of Moses parting The Red Sea, with the Israelites being chased by Egyptians through the parted waves. The shot I did for this sequence is a slightly top down shot, following the fleeing crowds through the freshly created gap in the ocean. To achieve this, I effectively split the 3d ocean into horizontal grids and vertical grids. The horizontal grids were simulated with aaOcean in Softimage. The vertical ones were distorted to represent the sea walls, textured with composited footage of waterfalls running upwards. The join where the two sets of grids met was blended using a matte and Nuke’s iDistort node. Softimage’s CrowdFX was used for the fleeing crowd. Twirling smoke elements were added once passed to the comp.

An advantage of Softimage’s ICE simulation system is that making a convincing cloud or mist is a fairly straight forward procedure. I was tasked with creating a storm over Jericho, a swirling mass of cloud and debris that had to look huge and imposing whilst looking down through the eye of the storm.
With clouds, water, and many other fluids, scale can be half the battle. A large wave only looks large if surrounded by smaller ones, a cloud only looks like a huge ominous mass if seen as a collection of smaller masses, but go too small and the effect is lost entirely. In the case of the cloud, if too many small details were apparent it very quickly seemed fluffy. Cute a storm is not. Once the cloud’s scale was correct, there was the issue of it having to spin, distort and generally seem organic. Handily ICE has a node for rotating clouds around points in space so that solved that one. The distortion was shape animation applied to a lattice attached to the cloud.

The rest of my involvement on The Bible was tracking shots in PFTrack and adding in set extensions. Most of the 3d content was rendered using Solid Angle’s Arnold Renderer.

The shots I mention above, along with a few others, are now online in my updated 2013 reel.

For further details on VFX in The Bible, check out FXGuide’s feature on Lola’s work.

Brand New Showreel!

The work in the following reel is created using Softimage, Terragen, Nuke and PFTrack.
Text in the bottom right shows what I created for each shot.
See PDF for further details.
Download PDF shot breakdown

Edited on 15th Oct – Now updated with work from The Bible Series and How To Build a Planet

CCTV-9 Documentary Channel Ident

Update! The CCTV-9 channel branding, including this ident, recently won a Gold for Best Channel Branding at the PromaxBDA awards in Singapore!

I was called back in to work at Lola in London for this Chinese TV channel ident for CCTV-9 Documentary. Only 2 of us worked on this shot: myself and Tim Zaccheo, head of 3D at Lola.

The ident sees a waterfall coming down the side of a cubic mountain. The camera pulls back down a valley with scenery akin to the Guilin area of China, then out into space to reveal that the Earth is indeed cubic. CCTV have a cubic theme, so this makes sense in context. Thanks to the real-world scale of Terragen and the existing workflow at Lola, Tim was able to come up with a camera move that once imported into Terragen matched perfectly with the Softimage scene. The Earth’s textures and even the clouds lined up perfectly in both sections allowing a seamless blend.

My part in this was embellishing the initially blocked out Terragen scene with the necessary details to make it look like the Guilin mountains. A challenge there was that Terragen is great for pointy Alpine style mountains dusted with snow. That is easy out of the box. Guilin mountains are almost bell jar in shape, carpeted in trees with rocky cliffs here and there. The valleys between have been eroded away by rivers, leaving behind relatively flat farming land.

The solution to this was a variety of painted map shaders. Although this allows flexibility and great detail when it comes to controlling displacements, they’re best replaced with actual textures if possible, else the rendering gets very intense. In this case it wasn’t really an option. The painted maps were used to define areas of low and high ground, plus to define where the river goes and to control where the farmland appeared.

As there is quite so much foliage in the area there needed to be a solution that didn’t rely entirely on populations of tree objects. In come the procedural trees. This is essentially a series of overlaid displacement textures that build up to create the cauliflower head look to the trees. Similarly, the farming land was achieved using a tiled texture of fields and a few trees distrbuted along hedgerows. It’s very easy in a procedural program like Terragen to forget that a bitmap texturing approach is still a valid method and often faster.

Something that took a while to figure out was the cubic mountain at the start. The cube was initially displaced using a square displacement map with a falloff around the edges, plus an area eroded away at the front. The stoney displacements were then layered on to this, taking the new normals into account, rather than throwing everything up vertically as is the default. It was then eroded in various directions using extra displacement maps.

The waterfall was Tim’s baby, done entirely in Softimage’s ICE using fairly straight forward techniques, but along with some coloured mattes it all came together nicely in the comp.

There’s no sound on the video above by the way. I’ll replace it with one with audio once I’ve located it.

Mankind – The Story of All of Us

For the past few months I’ve been working at Lola Post, London, on Mankind, soon to be shown on the History channel both here in the UK and the USA.

I worked on quite a few sequences, 30 shots in total. Most of these involved creating projectiles of differing sorts, predominantly arrows; People firing arrows, being shot by arrows, and avoiding arrows while simultaneously cheating the whole archer deal by using guns. All arrows in the sequence above are CG.

As with many documentaries, many shots on Mankind were illustrative map shots, presented as full scale Earth scenes and as full CG shots they were subject to much change. Luckily, the flexibility of CGI makes it easy to work outside the boundaries of reality and to change one’s mind.

A few of the shots I worked on involved creating digital sets. Firstly I created an aqueduct for a sequence of shots with Caesar in. This was a case of tracking shots, matching on set details and extending upwards.

The trickiest shot was a bullet time shot, first in the sequence above, showing an Irish navvy unwittingly getting a little too close to a tunnel blast within the Appelacians. The original footage was green screen with the actor effectively sitting on a green pole with the camera moving around him. This introduced a wobble but was significantly easier and cheaper than a timeslice rig. As the footage was ramped up and down as well as being slow mo, getting rid of the wobble was high priority and after many tests it was eventually solved with simple yet nifty 3d camera trickery.

To smooth out the wobble, I followed a suggestion of Lola’s MD, Grahame. Having tracked the raw footage in PFTrack I projected that original footage through the camera in Softimage onto a card, positioned where the actor should be. That way the actor stayed in the same place in 3d space whilst I moved my new 3d camera around him.

The entire environment in that shot is a 3d set I threw together out of multiple particle instances of the same handful of rock models.

Most of the other shots were relatively straight forward, the exception being another bullet time shot, this one actually being one of the first bullets ever fired! The footage for the start of the shot was different to that of the end, so although the start had lots of people thrusting spears and poles in a smokey landscape, the end was completely clear of people and smoke, plus the target dummy was way too near. To solve this I made a new 3d gun, texturing it with various camera projected textures from the original footage, then made a new background out of a humongous psd stitched together out of footage and photos. In the end none of the original footage is being used as footage, more as texturing inspiration! It’s a really long shot so I split it in the sequence above.

All the work I did on this show bar the Earth-scale shots was rendered using Arnold. This has an advantage over Mental Ray of being a fast method of getting realistic lighting complete with indirect light bouncing. The quality is superb. To me, Mental Ray is much more flexible, but Arnold trumps it for speed between initial light placement and realistic render. I’m very glad I’ve forced myself to learn it.

A few of the aforementioned Earth-scale map shots are shown below.

Stick vs Carrot – Why I don’t work for free

This is aimed not at vfx companies, but at individuals who need help on short films, student projects, promo work on their first independent music video and so on.

Ever since I began in this freelance career of mine I’ve been asked to work on many projects of a low budget nature, and even more of a no budget nature. My stock answer to emails asking if I wish to work on a low or no budget project is no. Here’s why.

The most common phrase used to entice me in these situations is, “We have little budget now, but it could lead to more work in the future.” This works 2 ways. More work in the future shows that you believe in this project. Or does it? The future work is the carrot, the current low budget is the stick. In business that stick is a problem.

If you have your kitchen replaced it would be fair to say that even on a shoe string budget you would find sufficient coin to pay for a plumber and a gas man. Why? Because done badly, the plumbing could flood your house causing expensive water damage and worse, a dodgy gas fitting can blow a house sky high. You are effectively investing in your future. If those tradesmen have done their job correctly first time around you should never need to call on them again. They are skilled in their craft and charge accordingly.

When I finish a job, the intellectual property rights including copyright, must be handed over to the client. Past that they can do what they like with it. Every shot I have ever done to be shown on the BBC for example is legally allowed to be placed into any show of their choosing whenever they like and they don’t have to tell me or pay for it again. In that respect, production companies get astounding value for money out of vfx companies and thence freelancers like myself. In the same way as a plumber has years of practical on-the-job training and experience, so do I.

If I have a kitchen that needs plumbing I will pay someone that knows what they are doing. If they underquote, they are underselling, possibly inexperienced or trading illegally, all of which are bad. In that situation I would call someone else.

If you contact me for a quote on a small project, find it larger than you expected and go elsewhere, don’t be shocked if that elsewhere isn’t much cop or turns out to be just as expensive thanks to needing to hire someone else to sort out mistakes.

In short, you get what you pay for.

Quality, Speed, Affordability. Pick 2, the other one will suffer.

Sole Director of AJCGI LTD, Freelance 3D Artist for TV and Film, based near Ashford International, commutable from London