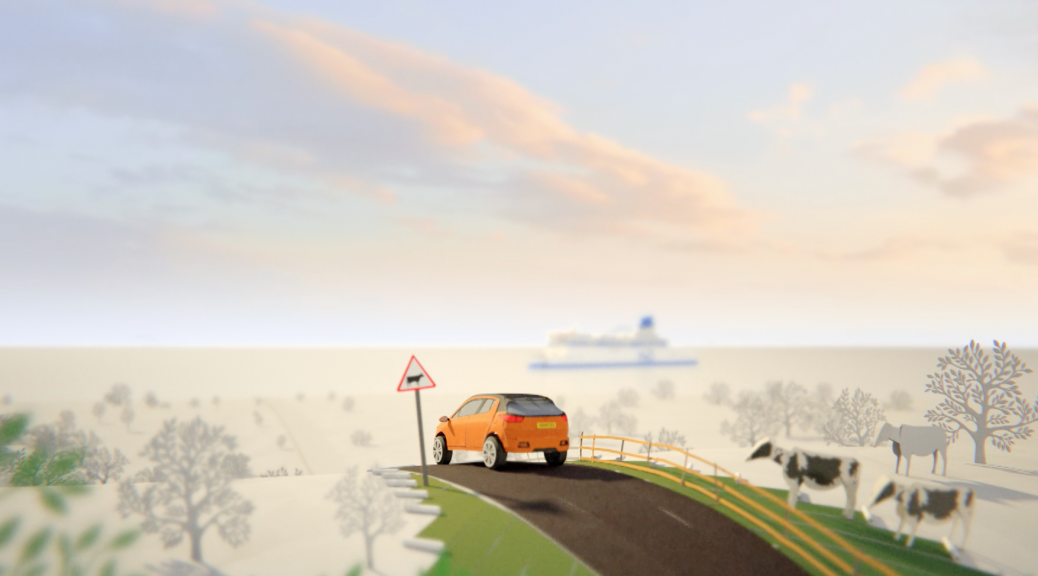
My last project before Christmas was at Seed Animation, somewhere I’d begun the year working on the surreal and hilarious Halwani Chicken commercial. This time around I was doing similar work on a P&O commercial, the style of which was to match a genuine stop-motion animation. As the client wished to see colour progressively spread through the world of our travelling couple, the choice to do this advert in 3d was made.
My input was as a layout guy and TD type. Layout is essentially placing things on screen in such a way that the eye feels comfortable when looking at the shots and is led to the correct area of interest. The TD (Technical Direction) input was mainly the unrolling paper effects seen throughout the animation.
Each strip of rolling paper was actually one long grid, flat by default, with a controller null at one end. A spiral curve was parented to that null and the grid deformed by that curve. As the null moved the spiral along the grid, an expression offset the position of the grid so it stayed put and the end unrolled. The grid was then extruded to give it thickness in its unrolled position, the new polygons kept in a separate cluster so they remained white, giving the impression of cut paper. As the operator stack remained live, the whole thing could be rolled back up, placed to suit the layout, then unrolled and deformed by a lattice to hug the surface it’s sat on. Having been animated, the whole thing was then converted to 2s so it mimicked the stop-motion 12fps standard.
Other inputs from me included the wobbly sellophane-like wake at the bottom of the ferry and the stones building up the castle in the background.
As with the Halwani commercial earlier in 2016, the whole project was rendered using Redshift 3D out of Softimage. Render times from Redshift still blow me away. It’s such a boon for small studios.
After assisting on a PS4 ad, tweaking a few shots to help another 3D guy with his workload, I moved onto this advert for Swisscom.
Layout is a stage that many of us do as part of shot creation. It’s similar to photographic composition in that elements in a scene must fit together on screen to draw the viewers’ attention to the right things, give scale to a shot, or perhaps a sense of drama or relaxation. In this case the skiier has to look fast so the piste has to be described on the mountainside in a way that suggests quick downhill progress in each shot.
We placed lots of fences in such a way that when someone else came along with a working system for simulating the wobble of said fences they were already there and the layout wouldn’t have to be worked on. This is almost always wrong as the layout tends to be adjusted according to client’s needs. For example if they feel the background isn’t working, perhaps the matte painting will need changing and the piste now runs into a mountainside. Looking at the final cut for the first time recently made me notice this had indeed happened and the fences had been adjusted accordingly.
All in all the piste appears consistent in width and our skiier makes it down to the finish line in double quick time!
To me this is quite a clever little advert, something that Glassworks seem to specialise in.
Recently I was fortunate enough to work with the guys at Seed Animation in Soho, London. As soon as I sat with owner Neil Kidney and watched the initial storyboarded animatic for what was to be a minute long Egyptian commercial for fast food chicken giants Halwani, I knew it was going to be an interesting month or so. Every shot was packed with details, loads of characters, and environments that at first glance seemed to all be different. With the addition of an Arabic song and fast cuts of shots that seemed to include a concentration camp and a swimming pool of frying oil, this project became something I doubt I’ll forget in a hurry.
My involvement was as one of 2 TD and lighting types, picking up from where someone else had left off, a position that can be a little tricky. Everybody approaches technical setups differently, so some adjustments were necessary. Animators were brought in to animate chickens, and others were off site modelling and setting up the fluid simulation for the swimming pool of boiling oil.
As this was a Softimage project, much of the technical side of this animation was created using ICE. My first task to conquer was the external landscape setup and layout, while my partner in TD crime, Ogi (Ognjen Vukovic) was busying himself with initial lighting setups and a feather system based on ICE strands.
The landscape setup was similar for every external shot. There is a large grid from which another higher res mesh is generated. That mesh has weight maps on which drive the distributions of grasses, stones, paths, and rocks, all of which are instantiated using scatter tools in ICE. The trees are a simple underlying mesh with a pointcloud of instanced leaves at the top. Bizarrely enough I was initially using a feather system, FC Feathers, for the leaves as it gave me great control over the overall flow, but that was junked in favour of a random distribution, bar on one of the designs, the pine tree, where it still works well.
Once we’d blocked out all the initial layouts, we started to combine every shot into something that could be lit nicely and render quickly. Each animated chicken was cached out from an animation scene using the Alembic .abc format, then imported into Softimage using a Python script Ogi had written that applied the animation from the Alembic cache onto the feathered chicken.
With the feathers in place, the grass, rocks, trees, flowers, distant hills and the myriad of fences and buildings were beginning to add up, a challenge for rendering anywhere, let alone Seed, a small studio with only a few full time staff and a proportionally sized render farm. The solution to this challenge was the truly remarkable Redshift 3D Renderer. This uses GPU rendering with Nvidia CUDA compatible cards. It’s fast. No. It’s really fast. With all the aforementioned details in shot, render times ranged from about 6 to 10 minutes per frame for most shots, including the time taken to send the scene to Redshift. That’s with reasonable sample settings, sometimes volumetric lighting, and at Full HD. We had a handful of PCs, mostly with two 980GTX cards fitted, though others had Quadros inside. Consider that… the power of thousands of pounds worth of CPU rendering hardware in a pair of gaming cards!
The only limit we found with such complicated scenes was RAM. Redshift uses the graphics RAM for its rendering, not only your PC’s RAM which is a major limitation if you only have a 4GB card for example. With so many geometry instances, feathers and other models in our scenes, it was actually system RAM which was a limiting issue and thereby scene extraction time too as the PCs were paging to the hard drive. The solution to this was to cache out the animated characters from the assembly scenes to Redshift proxy caches, then read them back in to a new scene and render from there.
Technicalities aside, lighting and set dressing was wonderfully straight forward and a joyous thing indeed. I have actually used Redshift before at Glassworks, just around the corner from Seed, but this was the first time I was lighting such complicated scenes with it. I recently returned to a studio where they were rendering using VRay and my old buddy Mental Ray. The latter in particular felt archaic, much more so than it ever has. I guess I held on to that one so long because of its tight integration with Softimage.
We’re all very pleased with the results on this ad. It was a brilliant team of exceptional talent. The animation especially helps, adding to the madness of such a quirky piece! Altogether now! Bwaaa! Cluck! Cla cla cluck!
Apparently an English dub is in the works…
A few months back I worked on a trailer for the South Bank Show, featuring Melvyn Bragg walking through the Leake St tunnel under Waterloo station. Bragg was shot on a greenscreen, with the environment being recreated in Softimage by myself and fellow freelancer Rasik Gorecha.
The obvious question there is why? Why can’t Mr. Bragg just go into the tunnel and we shoot it there, huh? Well, there are a few obvious answers to that. The tunnel, itself a road with access to a car wash half way down, is dank, contains certain undesirable types Mr. Bragg would probably best steer clear of, and is continually in flux thanks to it being one of the few areas in London where it is legal to graffiti. It’s also not the most comfortable of places to sit around in for long hours on a shoot. The other reason is that lots of the graffiti was to be replaced with animated posters and artwork featuring well known faces from the arts. That process is a lot easier if created digitally and lit using indirect lighting solutions.
My input on this was twofold. Firstly I set up the lighting in Arnold. After an hour or so of experimenting, the solution found was to place shadow casting point lights in the ceiling under about half of the strip light fittings, plus a spot light at either end of the tunnel. Additional fill lights were used to brighten up the nearest walls. The lights in the walls toward the back of the tunnel are merely textured models and not actual lights.
One of the things with a Global Illumination solution like Arnold is that it can lead to fizzing. One solution to lighting this tunnel would be area lights. This was ditched as a plan extraordinarily fast as it led to lots of noise, plus the modelled lights themselves act as bounce cards essentially negating the need for area lights at all.
Rasik had the majority of the modelling done by the time I joined in the project but was yet to embark on cables. Whilst he set up initial texturing, I became cable monkey. I modelled cables and brackets, trays for them to run along, pipes and all sorts. It took a few days of continually modelling cables before I’d finished them. Simple stuff but it really added to the believability.
The top of the two images above is the model with finished textures and below that is the finished lighting.
The final trailer is not as it appeared on Sky for 2 reasons. They added their own logo at the end, naturally enough, and they own full copyright of the sound bizarrely, so mine’s a silent movie. Add your own ragtime soundtrack as appropriate.
Update! The CCTV-9 channel branding, including this ident, recently won a Gold for Best Channel Branding at the PromaxBDA awards in Singapore!
I was called back in to work at Lola in London for this Chinese TV channel ident for CCTV-9 Documentary. Only 2 of us worked on this shot: myself and Tim Zaccheo, head of 3D at Lola.
The ident sees a waterfall coming down the side of a cubic mountain. The camera pulls back down a valley with scenery akin to the Guilin area of China, then out into space to reveal that the Earth is indeed cubic. CCTV have a cubic theme, so this makes sense in context. Thanks to the real-world scale of Terragen and the existing workflow at Lola, Tim was able to come up with a camera move that once imported into Terragen matched perfectly with the Softimage scene. The Earth’s textures and even the clouds lined up perfectly in both sections allowing a seamless blend.
My part in this was embellishing the initially blocked out Terragen scene with the necessary details to make it look like the Guilin mountains. A challenge there was that Terragen is great for pointy Alpine style mountains dusted with snow. That is easy out of the box. Guilin mountains are almost bell jar in shape, carpeted in trees with rocky cliffs here and there. The valleys between have been eroded away by rivers, leaving behind relatively flat farming land.
The solution to this was a variety of painted map shaders. Although this allows flexibility and great detail when it comes to controlling displacements, they’re best replaced with actual textures if possible, else the rendering gets very intense. In this case it wasn’t really an option. The painted maps were used to define areas of low and high ground, plus to define where the river goes and to control where the farmland appeared.
As there is quite so much foliage in the area there needed to be a solution that didn’t rely entirely on populations of tree objects. In come the procedural trees. This is essentially a series of overlaid displacement textures that build up to create the cauliflower head look to the trees. Similarly, the farming land was achieved using a tiled texture of fields and a few trees distrbuted along hedgerows. It’s very easy in a procedural program like Terragen to forget that a bitmap texturing approach is still a valid method and often faster.
Something that took a while to figure out was the cubic mountain at the start. The cube was initially displaced using a square displacement map with a falloff around the edges, plus an area eroded away at the front. The stoney displacements were then layered on to this, taking the new normals into account, rather than throwing everything up vertically as is the default. It was then eroded in various directions using extra displacement maps.
The waterfall was Tim’s baby, done entirely in Softimage’s ICE using fairly straight forward techniques, but along with some coloured mattes it all came together nicely in the comp.
There’s no sound on the video above by the way. I’ll replace it with one with audio once I’ve located it.