For me, there was a lot of set extension work to do including a recreation of the famous 90s neon signs at Piccadilly Circus. Naturally, being The Crown, there were also ground level, rooftop and aerial shots of Windsor Castle. I created a dilapidated look for Villa Windsor (Mohamed Al Fayed’s gift to The Queen) and was even called upon to replace an errant non-royal yacht. (How dare the late Steve Jobs leave it in shot!)
Work on the show took lots of hours of research and meticulous attention to detail, creating 3D in Houdini, projections in Photoshop, painting up in Substance Painter, rendering in Redshift.
A challenge for me is that I really enjoy the show and wanted to work on it for years, so ended up treating each shot as if it was my last. At one point I was dreaming of various tones of wall in the shots of Windsor Castle. What helped immensely and stopped me painting myself in to a corner was the exceptional production team whose feedback and documentation of the shoots was on point.
The yacht was a peculiar beast. Yachts are often very smooth, white, shiny, looking like fresh CGI frankly. With this being an HDR project I had to make sure we had details that were matching the plate, even out of the range of the SDR monitors most of us work with daily. When doing my rough comps I knocked the exposure of everything down to check it matched, then brought it up again.
One aspect of this project that really helped is the mountain of photos out there on the web. I’m really grateful for those of you who visited Piccadilly in the 90s with a camera or indeed the millions who’ve documented Windsor and the show’s Windsor, Burghley House over the years!
Set work is just one string to my bow – see other projects here.
For the last nine months I’ve been working for Fluid Pictures on graphics for Raw TV’s Gold Rush, a documentary series for Discovery Channel.
There seem to be two responses to the above. One is to ask what the show entails, the other is to ask why on Earth it needs visual effects. I tend to think of the Gold Rush work to be 3D graphics rather than VFX as it clearly isn’t aiming for a photoreal aesthetic. Unfortunately it’s this that keeps the show off my reel as the two styles clash. Luckily for me, Fluid have their own reel of graphics we’ve made!
I worked on many of these shots, bar the ones at 00:11, 00:17, 00:20, 00:26, 00:31, 00:42, 00:50, 00:53, 00:59, 1:03
I’ve personally been involved with season 10-12 and even a few shots on season 9. Each season is around 24 episodes long, with earlier episodes being broadcast as the later ones are edited. This time constraint, with a delivery every week, means graphics can’t be too fancy or they would continually fall very short of the client’s ideal.
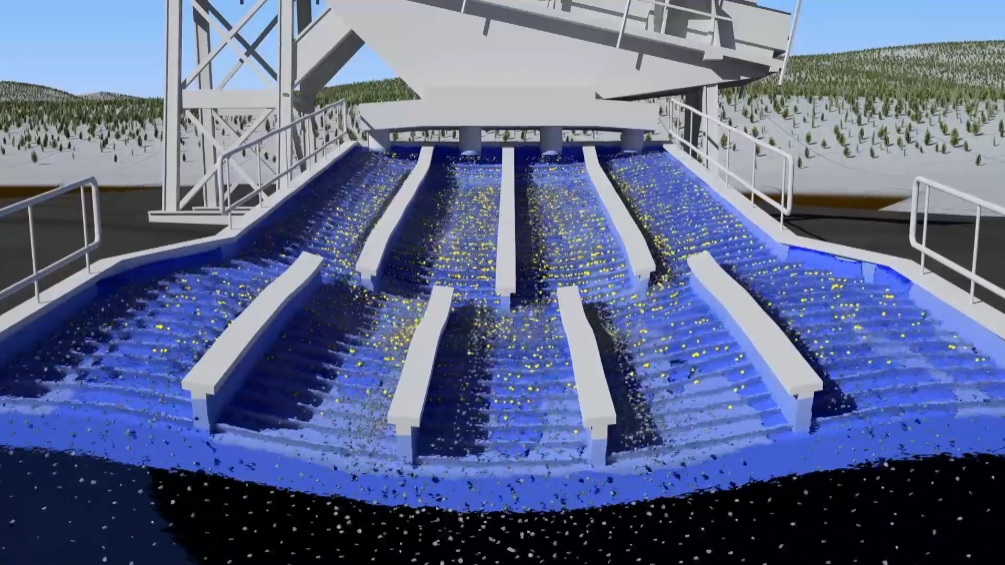
That all being said, we used Houdini as the 3D software of choice, usually used as a straight VFX tool. The node-based methodology, excellent terrain tools and a fairly logical workflow worked in our favour. It was the first time where locations could easily be referenced directly from GIS data. We made tools for drawing out rivers, the cuts in the ground, tree distributions and so on, such that we could concentrate on the shot content. Much of the time the graphics explain how things work or the challenge of moving material from one location to another, but also mechanical things break, especially those with moving parts, so many of the graphics are there to show the problem and how it’s solved.
Oddly there are still technical challenges on this show, with Houdini FX actually being necessary for smoke. Also, although we had simpler Houdini Core solutions for dirt, water and conveyors, we needed to show these things going wrong dynamically or illustrate a point close up.
The show has improved my Redshift 3D skills and made me learn about HDAs, rigging excavators, POP fluids, and machining engine parts using VDBs. That being said, three series is enough for me now. I’m moving on to pastures new with actual VFX work on actual plates.
Gold Rush, at times in its life the most watched show in America on a Friday night, is available on the Discovery network of channels and Discovery+ in the UK.
It’s now a decade since I first cut my teeth doing VFX on music videos. Lots has changed, technology has marched on at a huge pace, and yet the fundamental way of approaching a shot is almost the same.
Simple solutions are often the most effective ones and in particular those you know and can trust. For me this has meant finding appropriate methods for a particular time & situation and sticking with them for similar projects in the future. Consequently alongside my extensive Softimage, Terragen and PFTrack experience, my VFX fingers have touched Adobe products, GIMP, Deep Exploration, SpeedTree, Global Mapper, Inkscape, Combustion, Nuke, Maya, Max, and Cinema 4D.
As a generalist with such a broad background skillset, I found myself recently in an unusual position; that of a 3D lead artist on a 60 episode long TV series. All in all I spent a year working alongside a team of staff from both the production and post production side of things. I was even on set for a stint, something I hadn’t done for many years. Rather irritatingly, the whole thing is under wraps so I can’t say a word about that directly until it’s broadcast.
In the past 10 years I’ve learnt more than I could possibly have imagined when I left college. Here’s a few things I’d like to pass on to those entering the brave new (actually quite old) world of VFX. They’re based on my experience, so might not match the opinion of others.
Firstly and most importantly, listen to those telling you not to be sedentary. Stand up often and walk around. Consider a standing desk. Exercise regularly. You need it. Yes you do. Fresh air too, and daylight. By daylight I mean directly from the Sun, not a simulation bulb. Plus if you work from home, which you may well do at some point, human contact is essential. You need those breaks from the screen to be a human being rather than a ‘zombie’ as I’ve heard execs refer to VFX guys as.
On a similar note, burning the candle at both ends does nobody any good. Try to avoid long hours, even if you are enjoying a project. Past a certain point in the day, I find the work I am doing is deteriorating in quality and my brain is no longer functioning at its best. On that note, drink plenty of water. Lots of offices are air-conditioned and will dry you out very fast. If you must work extra time, try to wangle a weekend, especially if you’re a freelancer. You’ll get paid an extra day and will have the benefit of further sleep. Some of my best work has been done on a Saturday.
Don’t be ashamed to take shortcuts or cheat. The whole of VFX is a cheat, a lie. It’s OK to use stock libraries for footage, elements, sound, textures and even models. Quality varies so do your research, but the time you could save will actually save money in the end too. For an HD project, consider rendering out elements at 720p, then upscaling in the comp. 720p has less than a million pixels in it. 1080p has over 2 million. Render times are much lower and many cannot tell the difference in image quality. There are rare exceptions to this, but I’ve even passed SD anamorphic widescreen renders of skies and the like to be composited before now and nobody’s noticed or cared. If it is matching something soft in the background footage or is out of focus anyway, it just doesn’t matter.
Keep curious. Ask questions of those around you, whether they’re older or younger, wiser or greener. Everybody knows something the person next to them doesn’t and in this profession, that’s especially true. Whether you are self-taught or degree educated, you cannot possibly know all there is to know about the huge amount of software and associated techniques. Remember what I wrote earlier about simple solutions? The more experienced near you will possibly know them, so just ask. Don’t waste four hours struggling to do something that could be done in one hour using a technique they know.
VFX isn’t all about big budget movies and long form TV shows. Consider using your skills elsewhere. There’s a huge amount of corporate and educational work out there. I did quite a long stint of work on illustrative animations for educational websites and kids TV. As another example, did you know there’s 3D warehouse simulation software, requiring many real-time 3D models? Now you do.
Finally, if you’re a freelancer, get used to this question: “So what are you working on at the moment?”
My answer is currently, “Nothing,” so feel free to get in touch!
If you have no money, don’t, but do read this: https://www.ajcgi.co.uk/blog/?p=855
For those pondering if I’m available to work, here’s a quick update. I am currently fully booked until August in a lead role.
I’ve been working on the same project all the way from last summer until the one that’s coming, setting up systems, dealing with clients a lot closer than before. I even had a period of working on set daily which is previously only something I’d done on sporadic days, several years ago!
The project is strictly under wraps so I can’t reveal what it is, but it’s very exciting and I’ve certainly been learning a lot on the job.
After completion, there’s a strong chance I won’t want to jump straight into something else. If you want to book me in for September onwards, that’s a safer bet than August for sure.
Recently I’ve been retraining in Maya and giving myself extra alone time with the Arnold renderer from Solid Angle.
I decided to use this as not only an opportunity to find out how my Softimage lighting and rendering skills translate to Maya, but to show how basic compositing is something that every 3d artist should embrace if they don’t already.
One thing which has surprised me again and again is how little students and graduates of 3d courses are given a grounding in understanding what goes into their image and why it’s beneficial to use the compositing process as part of their workflow. Some students are even penalised for not showing their raw unenhanced render, having points deducted for daring to composite. To give a parallel, this to me is like a film photography student handing in negatives and no prints. The job is half done.
This won’t be a tutorial, more a pointer in the right direction for those who are starting out.
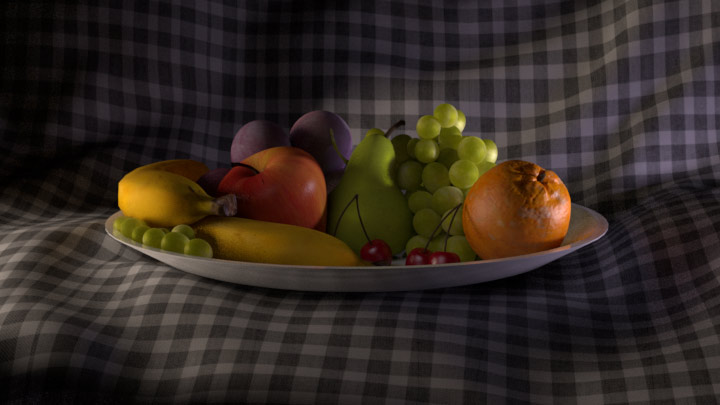
The example I use, a still life of a bowl of fruit, is a model from the very first lighting challenge hosted over at CGTalk. The files and others are downloadable at 3dRender. The model’s pretty old now so it’s not especially high detail but is still sufficient to show you what I intend to.
After a bit of setup in Maya and throwing on some pretty rough textures, here’s the beauty straight out of Arnold:
It’s lit with 3 lights; A cool exterior light, a warmer interior light, and a fill for the shadow in the middle. On their own, the images appear like this:
These images can be added together in any compositing software and they will give exactly the same result as the beauty above, to the extent that a pixel on the beauty will be exactly the same colour as when these three images are added together.
Each of these images is itself a composite image. Arnold, Mental Ray, Vray and other renderers consider many different material properties when returning the final colour for a particular pixel. Each property can be saved out as an image itself and added together to form the final image. In the case of the beauty itself, these are the images that I’ve rendered out of Arnold:
Again, added together, these form the same image as the beauty above perfectly.
(A side note here: A few component images are missing, including reflections, but were missed out of this contact sheet as they are entirely black. As none of the materials are reflective in the traditional sense, the reflection image is returned as black, whereas the direct specular contains highlights that mimic reflections. Arnold is peculiar in that it can consider reflections in 2 ways and transparency in 2 ways, depending on what is trying to be achieved.)
So what am I getting at here?
Here’s the beauty again:
Now here is a warm, evening setup:
And finally, a night lighting setup:
All three use the same component images, composited together in different ways: For example, tinting the lights, changing the intensity by blending the images with varying opacity, or even desaturating the key light to achieve a moonlit interior effect. On the night lighting I’ve changed the apple using a matte together with the specular & sss channels from the fill light. It was too bright and waxy. I could have re-rendered the 3d perhaps, but a tweak in Nuke was a lot more efficient.
The compositing process, even at this basic level, allows for flexibility from the get go. Where clients are concerned, flexibility is key. When passing work by a client it’s inevitable that changes will be requested and often they are something subtle that can be achieved in the composite. If you try to achieve that yourself using only 3d solutions, the render times will get long, especially when working on tv or film. Ordinarily I work alongside compositors and it’s up to them to do compositing tweaks whilst I work on a new shot or more substantial alterations to a current one.
Similarly, when first lighting a shot, working with many rendered channels, including additional ones of your own creation, is a rapid method of figuring out whether your setup is indeed heading in the right direction. Using the same component images for multiple looks is a time saver too.
One thing to bear in mind is once you know which channels are likely to be needed, it’s time to stop rendering the others as these can fill up hard drives quite nicely.
In short, stop tweaking your 3d scenes asap. Render out your initial lighting setup and see how much can be done in the comp. It isn’t cheating; It’s part of the process. It allows you to render the shot out, pass it on, and start a new one. Ultimately it will help your relationship with compositors who like to know what’s going into your image and what they need to add, plus [perhaps I shouldn’t say this, but here goes] it will make you more employable.
Recently in America, The History Channel broadcast The Bible Series, knocking American Idol into the weeds for ratings. The real reason of course to celebrate this fact is that I worked on VFX for this, along with many others hired by / working at Lola Post, London.
There were hundreds of shots. As the series covers many well-known events that are either epic in scale or miraculous in nature, it’s hard to cut corners with this kind of content.
One of the advantages of VFX is the ability to extend sets or create new ones. The most used model shared amongst the 3d crew was that of Jerusalem. It was originally an off-the-shelf-model of a real scale model, intended to be seen from a distance, so it needed to be tweaked and improved upon where appropriate on a shot by shot basis. With so many artists having touched the model at one point or other, the lighting setup, materials and textures got improved to the extent that once composited, the shots really shone out. Many of the shots I did for The Bible featured Jerusalem, either as an entirely CG set or an extension tracked into existing footage.
One story that is covered in the show is that of Moses parting The Red Sea, with the Israelites being chased by Egyptians through the parted waves. The shot I did for this sequence is a slightly top down shot, following the fleeing crowds through the freshly created gap in the ocean. To achieve this, I effectively split the 3d ocean into horizontal grids and vertical grids. The horizontal grids were simulated with aaOcean in Softimage. The vertical ones were distorted to represent the sea walls, textured with composited footage of waterfalls running upwards. The join where the two sets of grids met was blended using a matte and Nuke’s iDistort node. Softimage’s CrowdFX was used for the fleeing crowd. Twirling smoke elements were added once passed to the comp.
An advantage of Softimage’s ICE simulation system is that making a convincing cloud or mist is a fairly straight forward procedure. I was tasked with creating a storm over Jericho, a swirling mass of cloud and debris that had to look huge and imposing whilst looking down through the eye of the storm. With clouds, water, and many other fluids, scale can be half the battle. A large wave only looks large if surrounded by smaller ones, a cloud only looks like a huge ominous mass if seen as a collection of smaller masses, but go too small and the effect is lost entirely. In the case of the cloud, if too many small details were apparent it very quickly seemed fluffy. Cute a storm is not. Once the cloud’s scale was correct, there was the issue of it having to spin, distort and generally seem organic. Handily ICE has a node for rotating clouds around points in space so that solved that one. The distortion was shape animation applied to a lattice attached to the cloud.
The rest of my involvement on The Bible was tracking shots in PFTrack and adding in set extensions. Most of the 3d content was rendered using Solid Angle’s Arnold Renderer.
After a long period of no blogging it is high time to update you all on what I’ve been up to in recent months, and indeed not-so recent months. Aside from the occasional time freelancing for others, I’ve mainly been encamped in Lola Post, London.
A little while back, myself and Tim Zaccheo, head of 3d for Lola, put together a TV ident for Chinese documentary channel, CCTV-9. I have yet to put this up here as I’m not sure it’s available anywhere else yet. Perhaps somebody in China could tell me if it’s broadcasting. If you head over to www.lola-post.com and look through the recent work there you will find a few screen grabs though! From my point of view, I did a fair amount of Terragen 2 work, really pushing the limits of what could be done with the time we had, recreating the somewhat iconic look of the Guilin Mountains and somehow fashioning a cubic mountain to go with CCTV’s cube theme they have. Tim was responsible for a rather smashing waterfall, comping, and the final resolve from the spherical Terragen world into a cubic Softimage one. It will make sense once I get hold of the video and post that up. Coming soon I promise!
After a brief hiatus of modelling trucks and various dockyard equipment I came back to Lola and started on the show that many others in London are working on, Mankind; The Story of All of Us, to be shown on History. It really is very VFX heavy and something to look forward to. Without revealing too much I’ve been animating arrows, maps, built an aqueduct faster than Caesar ever did, and worked on 2 bullet-time shots! Phew! It really is a cracker.
So expect a CCTV post soon and a Mankind related one closer to its broadcast.
On the Recent Work page, and indeed right here, is a video of a few of the shots I worked on for Orbit: Earth’s Extraordinary journey.
The first and last shots featured are both from the same ‘journey’ setup that was used for many other shots too. The setup featured many different elements on their own passes, each passed into its own part of a Nuke composition. As the project progressed, both the 3d scene and the Nuke script needed subtle reworking.
The second shot is a pair of emFluid particle systems, whereas the third is a simple enough ICE simulation in Softimage. The particles in those two shots were rendered with beta versions of Exorcortex’s Fury rendering system which loads the particles onto the graphics card, rendering them in OpenGL. Without Fury the second shot would have been particularly time-consuming to render. It contains millions of particles and took many many hours to cache out.
The first part, Journey to the Centre of the Planet, received praise all round on the whole which is great. Best thing I saw on Twitter was “Wouldn’t it be great if Richard Hammond reached the centre of the planet only to discover it was made of lego?”
That’s the shop, not the band, pop-pickers.
Recently I was called upon by Pretzel Films to aid them in the creation of an animation for the ladies clothing shop Oasis. We see a girl walking along changing clothes to suit her environment, the time of day and such, focussed on the idea that there is a pair of jeans for every occasion.
My input was the background images, drawn mostly by hand, then animated into the background based on a rough edit provided for me. The girl was not filmed against a green or blue screen, allowing the director, Jake Dypka a greater freedom when it came to lighting, however this did mean Jake ended up doing a lot of rotoscoping. Fortunately he was using the new rapid rotoscoping tools in After Effects CS5, which I’ve yet to look into. It was an enjoyable piece to work on, being something that provided enough creative leeway to not be restrictive.
Update: The film was viewable on Oasis-stores.com but is no longer part of their marketing. However, it is currently sitting on youtube apparently. http://bit.ly/a2ID0h