After many years of work I’ve finally built up enough new shots to replace much of my old reel. It served me well, bringing in many projects, and indeed some of the better shots still remain, but now with spangly new work alongside!
My contribution to each shot is shown briefly in the bottom left of the screen, with a much more detailed explanation written shot by shot in the PDF breakdown.
In the past few years I’ve been fortunate enough to work on some very interesting projects that have been subject to watertight NDAs. Now that they’ve been broadcast and the dust has settled, it’s a real bonus for me to finally be able to share some of these with you.
The MARS series and Teletubbies were two such projects. MARS was seven months of my time and if I recall correctly, Teletubbies was significantly longer. This left two large projects missing from my reel and consequently any updates to it felt kinda pointless as I’d only be adding one or two shots and labelling it a new reel. The thing with working in TV or film is not all shots that I work on are actually showreel-worthy. Many are similar to each other or shots I’ve made previously, or they may be created using other people’s systems, to the point that putting them in a reel of my own work feels disingenuous.
This reel has been a long time coming, so I hope you enjoy it!
It’s now a decade since I first cut my teeth doing VFX on music videos. Lots has changed, technology has marched on at a huge pace, and yet the fundamental way of approaching a shot is almost the same.
Simple solutions are often the most effective ones and in particular those you know and can trust. For me this has meant finding appropriate methods for a particular time & situation and sticking with them for similar projects in the future. Consequently alongside my extensive Softimage, Terragen and PFTrack experience, my VFX fingers have touched Adobe products, GIMP, Deep Exploration, SpeedTree, Global Mapper, Inkscape, Combustion, Nuke, Maya, Max, and Cinema 4D.
As a generalist with such a broad background skillset, I found myself recently in an unusual position; that of a 3D lead artist on a 60 episode long TV series. All in all I spent a year working alongside a team of staff from both the production and post production side of things. I was even on set for a stint, something I hadn’t done for many years. Rather irritatingly, the whole thing is under wraps so I can’t say a word about that directly until it’s broadcast.
In the past 10 years I’ve learnt more than I could possibly have imagined when I left college. Here’s a few things I’d like to pass on to those entering the brave new (actually quite old) world of VFX. They’re based on my experience, so might not match the opinion of others.
Firstly and most importantly, listen to those telling you not to be sedentary. Stand up often and walk around. Consider a standing desk. Exercise regularly. You need it. Yes you do. Fresh air too, and daylight. By daylight I mean directly from the Sun, not a simulation bulb. Plus if you work from home, which you may well do at some point, human contact is essential. You need those breaks from the screen to be a human being rather than a ‘zombie’ as I’ve heard execs refer to VFX guys as.
On a similar note, burning the candle at both ends does nobody any good. Try to avoid long hours, even if you are enjoying a project. Past a certain point in the day, I find the work I am doing is deteriorating in quality and my brain is no longer functioning at its best. On that note, drink plenty of water. Lots of offices are air-conditioned and will dry you out very fast. If you must work extra time, try to wangle a weekend, especially if you’re a freelancer. You’ll get paid an extra day and will have the benefit of further sleep. Some of my best work has been done on a Saturday.
Don’t be ashamed to take shortcuts or cheat. The whole of VFX is a cheat, a lie. It’s OK to use stock libraries for footage, elements, sound, textures and even models. Quality varies so do your research, but the time you could save will actually save money in the end too. For an HD project, consider rendering out elements at 720p, then upscaling in the comp. 720p has less than a million pixels in it. 1080p has over 2 million. Render times are much lower and many cannot tell the difference in image quality. There are rare exceptions to this, but I’ve even passed SD anamorphic widescreen renders of skies and the like to be composited before now and nobody’s noticed or cared. If it is matching something soft in the background footage or is out of focus anyway, it just doesn’t matter.
Keep curious. Ask questions of those around you, whether they’re older or younger, wiser or greener. Everybody knows something the person next to them doesn’t and in this profession, that’s especially true. Whether you are self-taught or degree educated, you cannot possibly know all there is to know about the huge amount of software and associated techniques. Remember what I wrote earlier about simple solutions? The more experienced near you will possibly know them, so just ask. Don’t waste four hours struggling to do something that could be done in one hour using a technique they know.
VFX isn’t all about big budget movies and long form TV shows. Consider using your skills elsewhere. There’s a huge amount of corporate and educational work out there. I did quite a long stint of work on illustrative animations for educational websites and kids TV. As another example, did you know there’s 3D warehouse simulation software, requiring many real-time 3D models? Now you do.
Finally, if you’re a freelancer, get used to this question: “So what are you working on at the moment?”
My answer is currently, “Nothing,” so feel free to get in touch!
If you have no money, don’t, but do read this: https://www.ajcgi.co.uk/blog/?p=855
For those pondering if I’m available to work, here’s a quick update. I am currently fully booked until August in a lead role.
I’ve been working on the same project all the way from last summer until the one that’s coming, setting up systems, dealing with clients a lot closer than before. I even had a period of working on set daily which is previously only something I’d done on sporadic days, several years ago!
The project is strictly under wraps so I can’t reveal what it is, but it’s very exciting and I’ve certainly been learning a lot on the job.
After completion, there’s a strong chance I won’t want to jump straight into something else. If you want to book me in for September onwards, that’s a safer bet than August for sure.
This past few months I’ve been beavering away at Lola Post on 2 series of shows, creating VFX of a weathery, Earth-scale nature for Britains’ Most Extreme Weather, and shots of all scales for series 3 of How The Universe Works.
Ordinarily I’d put together blog posts before a show goes to air, but in the case of Britain’s Most Extreme Weather it slipped from my mind as soon as I rocked back onto How The Universe Works. Much of my weathery input was particle systems and strands, either using existing setups from previous shows or creating new ones as appropriate. A particular favourite of mine was a system showing the movement of air around cyclones and anticyclones; A strand system that rotates particles around many points, allowing them to move fluidly from one direction to another as if air, all wrapped around a lovely spherical Earth.
How The Universe Works is a series I’ve been on for many many months now. I first started on it in November I think. The first episode, all about our Sun, is to be shown on 10th July on Science in the USA.
For that show I took Lola’s existing Sun cutaway setup, introducing a more boiling lava-like feel through judicious use of animated fractals and grads.
Overall I’ve worked on 8 episodes with a handful of shots in each show. After all that dedication to spheres in space I am now supervising the VFX on one of the last shows for this series!
More geeky details and videos for both shows to come!
This post aims to be a bit of a follow up to the Stick vs Carrot post I wrote a long while ago about why I don’t work for free. It presumes you are not wanting something for nothing, so if you are, or have little budget, I strongly encourage you to read Stick vs Carrot first. This post is aimed at exactly the same people, ie small industries, students/graduates wanting help with their videos, musicians wanting music video help. It is also for those who have never hired someone before to do VFX or consider all VFX to involve a green screen.
Regularly I’ll get emails saying something like, “I’ve just completed my first album and am looking to hire a VFX guy for help with my first music video. How much will it cost to add VFX to my dancers?”
Your question opens up a veritable Pandora’s Box of new questions. Much more information is needed.
In an ideal world, before you start a thing, even putting pen to paper to create a storyboard (you are creating a storyboard right?), plan out shooting, chat to VFX companies about what can and can’t be done. There are many quick, cheap solutions, but you may find some of your plans are way too adventurous. When filming with VFX in mind, rather than applying a fix-it-in-post attitude, a few pitfalls can be avoided, but also planned for. For example, many VFX are so-called invisible VFX. They don’t go bang, they don’t melt buildings into a raging torrent of water, they just sit in the background and hide things that may draw attention to themselves. Sometimes they’re even in the foreground. Period dramas are an excellent example of this. In Britain, we are lucky enough to still have many beautiful regency houses in fantastic condition, but they are often bordered by various modern paraphernalia such as electrical cables, gift shops, a nearby oilseed rape farm, a satellite dish, a Starbucks. All of this needs removing so it doesn’t feel incongruous with the regency feel of the drama. These invisible effects appear in many types of show or promo. On a small budget video they may also be invisible costs you haven’t considered. Look out for them.
When contacting VFX companies, (or especially in an effort to save cash, individual artists), check your budget. Really now, check it. If it’s really low, only a few thousand, consider how essential your chosen VFX really are. Junk things you’ve added because you saw it in The Hobbit and think it might be cool in your shaver advert. Don’t be offended if individuals like myself tell you to go away and save some cash. Add an extra contingency of about 40% on top if you can. Why? Things change. All the time. We’re all human and you may find that you don’t like the results, even if they do look thoroughly convincing. All VFX houses can provide quotes for you to assist roughly with your budgeting.
Make a storyboard. Even if it’s really rough sketches. There are guides to it online, but quick pointers are the following; an image for each shot, large arrows showing camera movement, VFX motion and direction. The more detail the better. It may seem time-consuming, but overall it will save you time and money. When chatting about VFX, refer to the boards, to scripts, to reference images, heck even full-on style guides and treatments are great. Knowing the camera you will shoot on is advantageous.
Even after all of this, there will be to-ing and fro-ing. This is natural as oddly enough it’s a creative process, but with some forward planning you’ll become a respected creative rather than one who inspires groaning upon entering a room. Take your time, plan ahead, ideally chat to VFX types before production, shoot only what you planned to, don’t move the goal posts and you’ll hit the end with minimal compromises.
The British cut is different to the US one. The cut shown on Sci had to be edited to allow for the ad breaks. So, if you like your Hammond unsullied, this is the showing for you! Additionally, this being the UK, Hammond appears in the title of his own show. The international cuts often drop his name so as to make them more marketable in countries where he is little known.
The second episode is likely to be broadcast a week or so later but is yet to be confirmed I think.
Not so long ago I worked at Lola Post, London, on another documentary hosted by Richard Hammond. Similar to the Journey to The Centre of The Planet and Bottom of The Ocean shows I worked on some time back, this entailed a heck of a lot of vfx.
The concept is that we see the constituent parts of scaled-down planets and the solar system being brought together in a large space over the Nevada desert. In order for Hammond to be able to present things at the necessary altitude, he is up at the top of a 2 mile high tower, which is obviously not real for various reasons. Nor is the desert much of the time. Or Hammond.
My input on the show was working on dust and sand particle systems. I was working on 2 sequences of shots. I will warn you now that some of this will get technical.
The first sequence shows a large swirling cloud of high-silica sand and iron. This includes a shot which was to become my baby for a month or two. It pulls out from Hammond at the top of the tower, back through the dust cloud swirling around him, then really far back so we see the entire 2km wide cloud in the context of the landscape around it. The whole shot is 30 seconds long.
The second sequence of shots shows the formation of Jupiter out of a large swirling disc of matter. Jupiter itself attracts dust inwards, which swirls as it approaches.
A few challenges presented themselves quite early on. One was creating particle systems in Softimage’s ICE that behaved correctly, especially when it came to dust orbiting Jupiter as the whole system itself swirls around the protosun. The initial swirling round the protosun was solved using a handy ICE compound that Lola have kicking about on their server, but if you use that twice in an ICE tree it is only evaluated once as it sets the velocity using an execute node, effectively overriding the new velocity value for each particle, rather than passing that out so it can be added to the previous velocity.
The solution to this was to break apart the compound. Integrating new nodes, including some out of a Move Towards Goal node, meant that I was able to make a new compound that I could proudly label Swirl Towards Goal. It sets the goal, then outputs a velocity which can be added to the velocity from the previous swirling compound higher up the tree. It even has sliders for distance falloff, swirl speed, and weight.
The most challenging aspect of this project was actually rendering. The swirling dust in each of my shots is made up of about 4 different clouds of particles. One alone has 60 million particles in it.
Enter Exocortex Fury, the fabled point renderer that was to save our bacon. Aside from one fluffy cloud pass per shot, rendered as a simple Mental Ray job on a separate lower detail cache, each cloud pass was rendered with Fury. Unlike traditional particle renderers that use CPU to render, Fury is a point renderer which can take advantage of the raw power of graphics cards. The upside is a far faster render compared to traditional methods, and done correctly it is beautiful. To speed things up further, particles which were offscreen were deleted so Fury wouldn’t consider them at all. Downsides are that it can flicker or buzz if you get the particle replication settings wrong and it has no verbose output to tell you quite how far it is through rendering. Between us dust monkeys many hours were spent waiting for Fury to do something or crash.
Adding to the complications was the scale of the main scene itself. The tower is rendered in Arnold, a renderer that works best when using one Softimage unit per metre. Unfortunately the huge scene scale caused problems elsewhere. In a couple of shots the camera is so high off the ground that mathematical rounding errors were causing the translation to wobble. Also, as particles, especially Fury-rendered ones, prefer to be in a small scene to a gigantic scene for similar mathematical reasons, they weren’t rendering correctly, if at all. The particles were in their own scenes for loading speed and memory overhead purposes, but in order to fix these issues, the whole system was 1/5 of the main scene scale and offset in such a way that it was closer to the scene origin yet would composite on top of the tower renders perfectly.
How to Build a Planet is on show in the US on Discovery’s Science channel before being shown to the UK in November. Discovery Sci – How to Build a Planet
Recently I’ve been retraining in Maya and giving myself extra alone time with the Arnold renderer from Solid Angle.
I decided to use this as not only an opportunity to find out how my Softimage lighting and rendering skills translate to Maya, but to show how basic compositing is something that every 3d artist should embrace if they don’t already.
One thing which has surprised me again and again is how little students and graduates of 3d courses are given a grounding in understanding what goes into their image and why it’s beneficial to use the compositing process as part of their workflow. Some students are even penalised for not showing their raw unenhanced render, having points deducted for daring to composite. To give a parallel, this to me is like a film photography student handing in negatives and no prints. The job is half done.
This won’t be a tutorial, more a pointer in the right direction for those who are starting out.
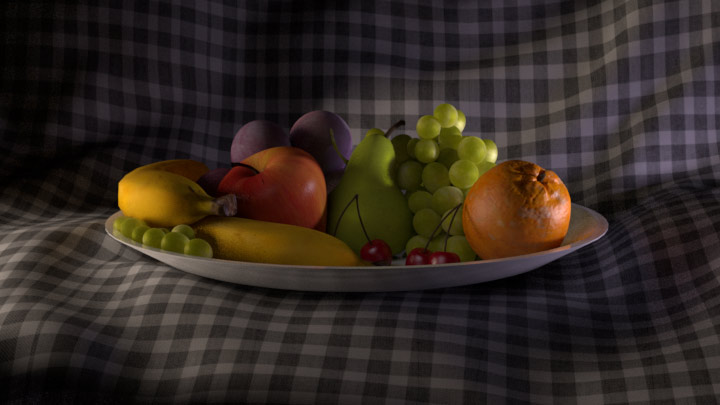
The example I use, a still life of a bowl of fruit, is a model from the very first lighting challenge hosted over at CGTalk. The files and others are downloadable at 3dRender. The model’s pretty old now so it’s not especially high detail but is still sufficient to show you what I intend to.
After a bit of setup in Maya and throwing on some pretty rough textures, here’s the beauty straight out of Arnold:
It’s lit with 3 lights; A cool exterior light, a warmer interior light, and a fill for the shadow in the middle. On their own, the images appear like this:
These images can be added together in any compositing software and they will give exactly the same result as the beauty above, to the extent that a pixel on the beauty will be exactly the same colour as when these three images are added together.
Each of these images is itself a composite image. Arnold, Mental Ray, Vray and other renderers consider many different material properties when returning the final colour for a particular pixel. Each property can be saved out as an image itself and added together to form the final image. In the case of the beauty itself, these are the images that I’ve rendered out of Arnold:
Again, added together, these form the same image as the beauty above perfectly.
(A side note here: A few component images are missing, including reflections, but were missed out of this contact sheet as they are entirely black. As none of the materials are reflective in the traditional sense, the reflection image is returned as black, whereas the direct specular contains highlights that mimic reflections. Arnold is peculiar in that it can consider reflections in 2 ways and transparency in 2 ways, depending on what is trying to be achieved.)
So what am I getting at here?
Here’s the beauty again:
Now here is a warm, evening setup:
And finally, a night lighting setup:
All three use the same component images, composited together in different ways: For example, tinting the lights, changing the intensity by blending the images with varying opacity, or even desaturating the key light to achieve a moonlit interior effect. On the night lighting I’ve changed the apple using a matte together with the specular & sss channels from the fill light. It was too bright and waxy. I could have re-rendered the 3d perhaps, but a tweak in Nuke was a lot more efficient.
The compositing process, even at this basic level, allows for flexibility from the get go. Where clients are concerned, flexibility is key. When passing work by a client it’s inevitable that changes will be requested and often they are something subtle that can be achieved in the composite. If you try to achieve that yourself using only 3d solutions, the render times will get long, especially when working on tv or film. Ordinarily I work alongside compositors and it’s up to them to do compositing tweaks whilst I work on a new shot or more substantial alterations to a current one.
Similarly, when first lighting a shot, working with many rendered channels, including additional ones of your own creation, is a rapid method of figuring out whether your setup is indeed heading in the right direction. Using the same component images for multiple looks is a time saver too.
One thing to bear in mind is once you know which channels are likely to be needed, it’s time to stop rendering the others as these can fill up hard drives quite nicely.
In short, stop tweaking your 3d scenes asap. Render out your initial lighting setup and see how much can be done in the comp. It isn’t cheating; It’s part of the process. It allows you to render the shot out, pass it on, and start a new one. Ultimately it will help your relationship with compositors who like to know what’s going into your image and what they need to add, plus [perhaps I shouldn’t say this, but here goes] it will make you more employable.
The work in the following reel is created using Softimage, Terragen, Nuke and PFTrack.
Text in the bottom right shows what I created for each shot.
See PDF for further details. Download PDF shot breakdown
Edited on 15th Oct – Now updated with work from The Bible Series and How To Build a Planet