For those pondering if I’m available to work, here’s a quick update. I am currently fully booked until August in a lead role.
I’ve been working on the same project all the way from last summer until the one that’s coming, setting up systems, dealing with clients a lot closer than before. I even had a period of working on set daily which is previously only something I’d done on sporadic days, several years ago!
The project is strictly under wraps so I can’t reveal what it is, but it’s very exciting and I’ve certainly been learning a lot on the job.
After completion, there’s a strong chance I won’t want to jump straight into something else. If you want to book me in for September onwards, that’s a safer bet than August for sure.
Tag Archives: 3d
Britain’s Most Extreme Weather and How The Universe Works
This past few months I’ve been beavering away at Lola Post on 2 series of shows, creating VFX of a weathery, Earth-scale nature for Britains’ Most Extreme Weather, and shots of all scales for series 3 of How The Universe Works.
Ordinarily I’d put together blog posts before a show goes to air, but in the case of Britain’s Most Extreme Weather it slipped from my mind as soon as I rocked back onto How The Universe Works. Much of my weathery input was particle systems and strands, either using existing setups from previous shows or creating new ones as appropriate. A particular favourite of mine was a system showing the movement of air around cyclones and anticyclones; A strand system that rotates particles around many points, allowing them to move fluidly from one direction to another as if air, all wrapped around a lovely spherical Earth.
How The Universe Works is a series I’ve been on for many many months now. I first started on it in November I think. The first episode, all about our Sun, is to be shown on 10th July on Science in the USA.
For that show I took Lola’s existing Sun cutaway setup, introducing a more boiling lava-like feel through judicious use of animated fractals and grads.
Overall I’ve worked on 8 episodes with a handful of shots in each show. After all that dedication to spheres in space I am now supervising the VFX on one of the last shows for this series!
More geeky details and videos for both shows to come!
So what is VFX? I do it for a living, yes, but what is it?
When I am asked what I do for a living, there is a follow-up question that is so common I begin to answer it right away now. That question is, “Ok, that sounds interesting. So what do you actually do? What is Visual Effects really?”
It’s a fair question actually and one whose answer changes as time goes on. If I’m stumped for an answer to the question, I try some of the following.
My staple answer now is,
“I add stuff to video footage that wasn’t there in the first place, or take it away if it wasn’t meant to be there.”
More often than not, the actual answer is,
“I create something with the appearance of having been shot as real life, but which is actually impossible to shoot, be that for practical, artistic or financial reasons.”
Ah, so that will answer it, right? Nope. I find these answers are enough for most people to understand at least vaguely what the end result of my job is. However, some are mad about film, TV dramas and whatnot and really want to show their interest. Again, fair enough. A question you might get is,
“So when you say you add things into video footage or film or whatever, how do you do that?”
That’s the really tricky one to answer, especially as everyone’s preconceptions of media, especially digital, are different. There’s the Make Awesome button right? It’s all done by the computer right?
However, wonderfully, a lot of people use Photoshop now and kind of get the concept of layering things over each other. Lately, I’ve been explaining with,
“VFX has similar principles to editing photographs, only these photos are on the move. Imagine using Photoshop for moving images, with all the layers and masks moving, the colour corrections animating and so on. I make elements, series of 2D images, that are composited on top of others, like layers are in Photoshop.”
I do almost exclusively 3D VFX, by which I mean those elements are created in a 3D package, such as Maya, rendered out as 2D images, just like photographs have no physical depth to them. I no longer get bogged down into details when explaining VFX. To begin with, I don’t even mention the many jobs available; compositor, modeller, 3D generalist, render wrangler etc. I used to say I did 3D animation, but that would lead people down the path of thinking I did Toy Story or was about to reinvent Wallace and Gromit. Another danger with the 3D moniker is the recent resurgence in 3D cinema which is another kettle of fish altogether.
So there we are. A fairly basic answer which most people understand! Incidentally, I am a 3D generalist, available to hire in London, UK. Check out my work on the home page at https://www.ajcgi.co.uk.
3d Generalist available for hire in London from May onwards. 8 years of experience.
From the start of May onwards I will be available for generalist 3d VFX work in London, UK.
My show reel and examples of work are on the home page at https://www.ajcgi.co.uk
I’ve been beavering away this year at a huge rate of knots, working on such things as adverts including one for BBC World Service, and documentaries for BBC and Channel 4. Videos and suchlike to come.
I have now have 8 years of producing shots across many media and platforms, mainly for dramas and documentaries.
More details on my PDF CV at https://www.ajcgi.co.uk/blog/?page_id=45
Alex
aj@ajcgi.co.uk
Why you need compositing in your 3d life
Recently I’ve been retraining in Maya and giving myself extra alone time with the Arnold renderer from Solid Angle.
I decided to use this as not only an opportunity to find out how my Softimage lighting and rendering skills translate to Maya, but to show how basic compositing is something that every 3d artist should embrace if they don’t already.
One thing which has surprised me again and again is how little students and graduates of 3d courses are given a grounding in understanding what goes into their image and why it’s beneficial to use the compositing process as part of their workflow. Some students are even penalised for not showing their raw unenhanced render, having points deducted for daring to composite. To give a parallel, this to me is like a film photography student handing in negatives and no prints. The job is half done.
This won’t be a tutorial, more a pointer in the right direction for those who are starting out.
The example I use, a still life of a bowl of fruit, is a model from the very first lighting challenge hosted over at CGTalk. The files and others are downloadable at 3dRender. The model’s pretty old now so it’s not especially high detail but is still sufficient to show you what I intend to.
After a bit of setup in Maya and throwing on some pretty rough textures, here’s the beauty straight out of Arnold:
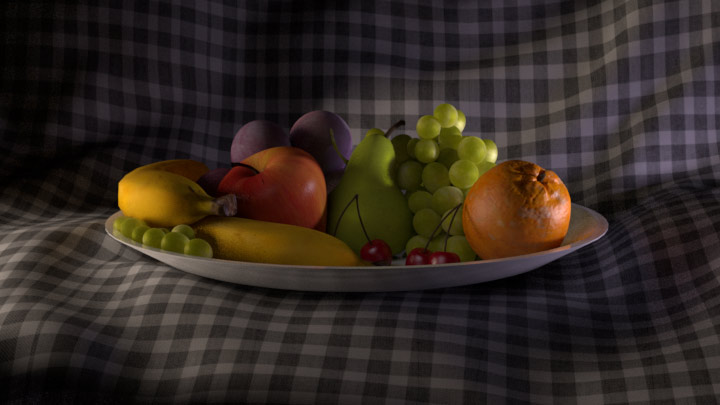
It’s lit with 3 lights; A cool exterior light, a warmer interior light, and a fill for the shadow in the middle. On their own, the images appear like this:

These images can be added together in any compositing software and they will give exactly the same result as the beauty above, to the extent that a pixel on the beauty will be exactly the same colour as when these three images are added together.
Each of these images is itself a composite image. Arnold, Mental Ray, Vray and other renderers consider many different material properties when returning the final colour for a particular pixel. Each property can be saved out as an image itself and added together to form the final image. In the case of the beauty itself, these are the images that I’ve rendered out of Arnold:

Again, added together, these form the same image as the beauty above perfectly.
(A side note here: A few component images are missing, including reflections, but were missed out of this contact sheet as they are entirely black. As none of the materials are reflective in the traditional sense, the reflection image is returned as black, whereas the direct specular contains highlights that mimic reflections. Arnold is peculiar in that it can consider reflections in 2 ways and transparency in 2 ways, depending on what is trying to be achieved.)So what am I getting at here?
Here’s the beauty again:
Now here is a warm, evening setup:

And finally, a night lighting setup:

All three use the same component images, composited together in different ways: For example, tinting the lights, changing the intensity by blending the images with varying opacity, or even desaturating the key light to achieve a moonlit interior effect. On the night lighting I’ve changed the apple using a matte together with the specular & sss channels from the fill light. It was too bright and waxy. I could have re-rendered the 3d perhaps, but a tweak in Nuke was a lot more efficient.
The compositing process, even at this basic level, allows for flexibility from the get go. Where clients are concerned, flexibility is key. When passing work by a client it’s inevitable that changes will be requested and often they are something subtle that can be achieved in the composite. If you try to achieve that yourself using only 3d solutions, the render times will get long, especially when working on tv or film. Ordinarily I work alongside compositors and it’s up to them to do compositing tweaks whilst I work on a new shot or more substantial alterations to a current one.
Similarly, when first lighting a shot, working with many rendered channels, including additional ones of your own creation, is a rapid method of figuring out whether your setup is indeed heading in the right direction. Using the same component images for multiple looks is a time saver too.
One thing to bear in mind is once you know which channels are likely to be needed, it’s time to stop rendering the others as these can fill up hard drives quite nicely.
In short, stop tweaking your 3d scenes asap. Render out your initial lighting setup and see how much can be done in the comp. It isn’t cheating; It’s part of the process. It allows you to render the shot out, pass it on, and start a new one. Ultimately it will help your relationship with compositors who like to know what’s going into your image and what they need to add, plus [perhaps I shouldn’t say this, but here goes] it will make you more employable.
South Bank Show Trailer
A few months back I worked on a trailer for the South Bank Show, featuring Melvyn Bragg walking through the Leake St tunnel under Waterloo station. Bragg was shot on a greenscreen, with the environment being recreated in Softimage by myself and fellow freelancer Rasik Gorecha.
The obvious question there is why? Why can’t Mr. Bragg just go into the tunnel and we shoot it there, huh? Well, there are a few obvious answers to that. The tunnel, itself a road with access to a car wash half way down, is dank, contains certain undesirable types Mr. Bragg would probably best steer clear of, and is continually in flux thanks to it being one of the few areas in London where it is legal to graffiti. It’s also not the most comfortable of places to sit around in for long hours on a shoot. The other reason is that lots of the graffiti was to be replaced with animated posters and artwork featuring well known faces from the arts. That process is a lot easier if created digitally and lit using indirect lighting solutions.
My input on this was twofold. Firstly I set up the lighting in Arnold. After an hour or so of experimenting, the solution found was to place shadow casting point lights in the ceiling under about half of the strip light fittings, plus a spot light at either end of the tunnel. Additional fill lights were used to brighten up the nearest walls. The lights in the walls toward the back of the tunnel are merely textured models and not actual lights.
One of the things with a Global Illumination solution like Arnold is that it can lead to fizzing. One solution to lighting this tunnel would be area lights. This was ditched as a plan extraordinarily fast as it led to lots of noise, plus the modelled lights themselves act as bounce cards essentially negating the need for area lights at all.
Rasik had the majority of the modelling done by the time I joined in the project but was yet to embark on cables. Whilst he set up initial texturing, I became cable monkey. I modelled cables and brackets, trays for them to run along, pipes and all sorts. It took a few days of continually modelling cables before I’d finished them. Simple stuff but it really added to the believability.

The top of the two images above is the model with finished textures and below that is the finished lighting.
The final trailer is not as it appeared on Sky for 2 reasons. They added their own logo at the end, naturally enough, and they own full copyright of the sound bizarrely, so mine’s a silent movie. Add your own ragtime soundtrack as appropriate.
The Bible Series – VFX
Recently in America, The History Channel broadcast The Bible Series, knocking American Idol into the weeds for ratings. The real reason of course to celebrate this fact is that I worked on VFX for this, along with many others hired by / working at Lola Post, London.
There were hundreds of shots. As the series covers many well-known events that are either epic in scale or miraculous in nature, it’s hard to cut corners with this kind of content.
One of the advantages of VFX is the ability to extend sets or create new ones. The most used model shared amongst the 3d crew was that of Jerusalem. It was originally an off-the-shelf-model of a real scale model, intended to be seen from a distance, so it needed to be tweaked and improved upon where appropriate on a shot by shot basis. With so many artists having touched the model at one point or other, the lighting setup, materials and textures got improved to the extent that once composited, the shots really shone out. Many of the shots I did for The Bible featured Jerusalem, either as an entirely CG set or an extension tracked into existing footage.
One story that is covered in the show is that of Moses parting The Red Sea, with the Israelites being chased by Egyptians through the parted waves. The shot I did for this sequence is a slightly top down shot, following the fleeing crowds through the freshly created gap in the ocean. To achieve this, I effectively split the 3d ocean into horizontal grids and vertical grids. The horizontal grids were simulated with aaOcean in Softimage. The vertical ones were distorted to represent the sea walls, textured with composited footage of waterfalls running upwards. The join where the two sets of grids met was blended using a matte and Nuke’s iDistort node. Softimage’s CrowdFX was used for the fleeing crowd. Twirling smoke elements were added once passed to the comp.
An advantage of Softimage’s ICE simulation system is that making a convincing cloud or mist is a fairly straight forward procedure. I was tasked with creating a storm over Jericho, a swirling mass of cloud and debris that had to look huge and imposing whilst looking down through the eye of the storm.
With clouds, water, and many other fluids, scale can be half the battle. A large wave only looks large if surrounded by smaller ones, a cloud only looks like a huge ominous mass if seen as a collection of smaller masses, but go too small and the effect is lost entirely. In the case of the cloud, if too many small details were apparent it very quickly seemed fluffy. Cute a storm is not. Once the cloud’s scale was correct, there was the issue of it having to spin, distort and generally seem organic. Handily ICE has a node for rotating clouds around points in space so that solved that one. The distortion was shape animation applied to a lattice attached to the cloud.
The rest of my involvement on The Bible was tracking shots in PFTrack and adding in set extensions. Most of the 3d content was rendered using Solid Angle’s Arnold Renderer.
The shots I mention above, along with a few others, are now online in my updated 2013 reel.
For further details on VFX in The Bible, check out FXGuide’s feature on Lola’s work.
Brand New Showreel!
The work in the following reel is created using Softimage, Terragen, Nuke and PFTrack.
Text in the bottom right shows what I created for each shot.
See PDF for further details.
Download PDF shot breakdown
Edited on 15th Oct – Now updated with work from The Bible Series and How To Build a Planet
CCTV-9 Documentary Channel Ident
Update! The CCTV-9 channel branding, including this ident, recently won a Gold for Best Channel Branding at the PromaxBDA awards in Singapore!
I was called back in to work at Lola in London for this Chinese TV channel ident for CCTV-9 Documentary. Only 2 of us worked on this shot: myself and Tim Zaccheo, head of 3D at Lola.
The ident sees a waterfall coming down the side of a cubic mountain. The camera pulls back down a valley with scenery akin to the Guilin area of China, then out into space to reveal that the Earth is indeed cubic. CCTV have a cubic theme, so this makes sense in context. Thanks to the real-world scale of Terragen and the existing workflow at Lola, Tim was able to come up with a camera move that once imported into Terragen matched perfectly with the Softimage scene. The Earth’s textures and even the clouds lined up perfectly in both sections allowing a seamless blend.
My part in this was embellishing the initially blocked out Terragen scene with the necessary details to make it look like the Guilin mountains. A challenge there was that Terragen is great for pointy Alpine style mountains dusted with snow. That is easy out of the box. Guilin mountains are almost bell jar in shape, carpeted in trees with rocky cliffs here and there. The valleys between have been eroded away by rivers, leaving behind relatively flat farming land.
The solution to this was a variety of painted map shaders. Although this allows flexibility and great detail when it comes to controlling displacements, they’re best replaced with actual textures if possible, else the rendering gets very intense. In this case it wasn’t really an option. The painted maps were used to define areas of low and high ground, plus to define where the river goes and to control where the farmland appeared.
As there is quite so much foliage in the area there needed to be a solution that didn’t rely entirely on populations of tree objects. In come the procedural trees. This is essentially a series of overlaid displacement textures that build up to create the cauliflower head look to the trees. Similarly, the farming land was achieved using a tiled texture of fields and a few trees distrbuted along hedgerows. It’s very easy in a procedural program like Terragen to forget that a bitmap texturing approach is still a valid method and often faster.
Something that took a while to figure out was the cubic mountain at the start. The cube was initially displaced using a square displacement map with a falloff around the edges, plus an area eroded away at the front. The stoney displacements were then layered on to this, taking the new normals into account, rather than throwing everything up vertically as is the default. It was then eroded in various directions using extra displacement maps.
The waterfall was Tim’s baby, done entirely in Softimage’s ICE using fairly straight forward techniques, but along with some coloured mattes it all came together nicely in the comp.
There’s no sound on the video above by the way. I’ll replace it with one with audio once I’ve located it.
Mankind – The Story of All of Us
For the past few months I’ve been working at Lola Post, London, on Mankind, soon to be shown on the History channel both here in the UK and the USA.
I worked on quite a few sequences, 30 shots in total. Most of these involved creating projectiles of differing sorts, predominantly arrows; People firing arrows, being shot by arrows, and avoiding arrows while simultaneously cheating the whole archer deal by using guns. All arrows in the sequence above are CG.
As with many documentaries, many shots on Mankind were illustrative map shots, presented as full scale Earth scenes and as full CG shots they were subject to much change. Luckily, the flexibility of CGI makes it easy to work outside the boundaries of reality and to change one’s mind.
A few of the shots I worked on involved creating digital sets. Firstly I created an aqueduct for a sequence of shots with Caesar in. This was a case of tracking shots, matching on set details and extending upwards.
The trickiest shot was a bullet time shot, first in the sequence above, showing an Irish navvy unwittingly getting a little too close to a tunnel blast within the Appelacians. The original footage was green screen with the actor effectively sitting on a green pole with the camera moving around him. This introduced a wobble but was significantly easier and cheaper than a timeslice rig. As the footage was ramped up and down as well as being slow mo, getting rid of the wobble was high priority and after many tests it was eventually solved with simple yet nifty 3d camera trickery.
To smooth out the wobble, I followed a suggestion of Lola’s MD, Grahame. Having tracked the raw footage in PFTrack I projected that original footage through the camera in Softimage onto a card, positioned where the actor should be. That way the actor stayed in the same place in 3d space whilst I moved my new 3d camera around him.
The entire environment in that shot is a 3d set I threw together out of multiple particle instances of the same handful of rock models.
Most of the other shots were relatively straight forward, the exception being another bullet time shot, this one actually being one of the first bullets ever fired! The footage for the start of the shot was different to that of the end, so although the start had lots of people thrusting spears and poles in a smokey landscape, the end was completely clear of people and smoke, plus the target dummy was way too near. To solve this I made a new 3d gun, texturing it with various camera projected textures from the original footage, then made a new background out of a humongous psd stitched together out of footage and photos. In the end none of the original footage is being used as footage, more as texturing inspiration! It’s a really long shot so I split it in the sequence above.
All the work I did on this show bar the Earth-scale shots was rendered using Arnold. This has an advantage over Mental Ray of being a fast method of getting realistic lighting complete with indirect light bouncing. The quality is superb. To me, Mental Ray is much more flexible, but Arnold trumps it for speed between initial light placement and realistic render. I’m very glad I’ve forced myself to learn it.
A few of the aforementioned Earth-scale map shots are shown below.