I’m currently available for 3D generalist work in the UK, ideally either remote, or as a hybrid to London arrangement. I do a lot of layout and environments, asset creation, lighting and leading small teams.
A Gentleman In Moscow is the last show I worked on during my latest stint at Rumble VFX. The reel above contains breakdowns of many of the shots I worked on.
Creating a City
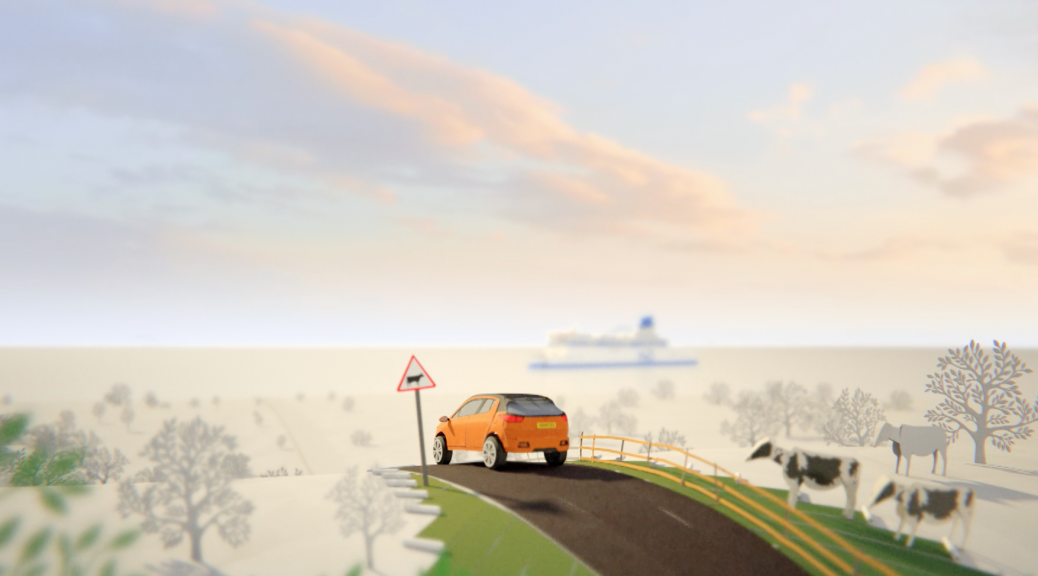
I was initially tasked with creating a reusable Moscow skyline asset. This was inspired by photographs of the 1920s and 1930s. Many of the buildings used were from off the shelf kits. These had textures, but weren’t yet set up for Redshift 3D, nor indeed Houdini ready. The process became much easier after a few models. For example I had a script set up to convert shaders to Redshift ones with the correct names and textures attached. All needed balancing to look approximately the same when brought in to one primary scene.
Photography of the time shows the typical Russian formal gardens in front of the Bolshoi and Metropol. I began the layout with these gardens, working out from there. Much of them are point instanced models of bushes, flowers and grasses with hero shrubs and trees placed by hand. This was in part because in some shots they got in the way and in others they needed adding to so as to give height to the scene.
Paved areas were defined with curves. Stoned edging and cambered road surfaces were added in procedurally along and away from the curves respectively. There was even a tram system for creating recessed metal rails in the road and slightly different cobbles on the ground. A separate one defined the power lines. In one shot I went to the extent of animating the over head lines and the pantograph on the tram, something that is maybe only visible on very large TVs!
Optimisation
A technical challenge with having so many models and lights in shot, was that of memory limits, especially VRAM. To remain quick at rendering Redshift must use less than the available GPU memory. Plants were read off disk at render and most of the buildings were converted to rs proxy files. They load in quickly and could still have their shaders altered globally for one specific pass, the snow.
The snow pass was in addition to the usual beauty with a snow material overriding all the usual ones. It was blended with the beauty using Normal, AO, noise and other custom AOVs in Nuke. This method allowed us to be flexible about the location of snow. As with other projects where I’m setting up a primary setup for a team I had a Nuke script that could show compositors roughly the end result I was aiming at.
Snow on the ground was actually one large grid with its own gentle undulations, pushed up near to buildings, street furniture and so on. It was then roughened in these locations and poly reduced, keeping the detail in these bumpy areas. To add further detail when seen at ground level, the snow grid was worked in to with displacement maps, particularly footprints.
Smashing work
Other tasks on A Gentleman In Moscow included animating a picture frame, shot by the count to alarm the hotel manager. In the plate, the practical gun went off then half a second later the picture swung down! For impact, timing and believability we decided to replace the whole thing post-firing. I made a simple model of the frame, complete with photo, mount board, glass and frame, then I set up a shattering system.
Stills on set gave me a great reference for which bits of glass remained in the frame and where the bullet hole should be. I drew out wobbly lines radiating from the hole and set up an RBD sim in Houdini. I had trouble getting the finesse I wanted from the SOP level shattering system so only used that to break the mesh in the first place, passing that and the constraints to a custom DOPnet. In there I gave the sim a speed limit, some drag and transferred velocity from the picture frame over the first frame or two for pieces within a certain range. This was to assist with the appearance of glass being pushed by the frame as well as the bullet. Anything that shot backwards for any reason was rapidly decreased in size so as to vanish.
The last few years have seen a lot of changes to my reel, though a couple of projects are missing, either through incongruity or tight Netflix IP restrictions, so I’ve snuck in some pre-pandemic stuff. I’m working on a private reel including shots from The Crown, so if you’d like to see that, get in touch via aj@ajcgi.co.uk.
Like many in the UK VFX scene I still work either remotely or hybrid. My commute in to London is a 4 hour round trip so please take that in to account if you get in touch after seeing this reel.
Primarily I use Houdini. There are some who would claim that’s not the weapon of choice for generalist work, but I would contest that. Lots of my work is documentary and drama content where I’ve been hired to do environments and set extensions. This means I do asset builds, scene layout, lighting, and just about everything including tracking and sometimes the compositing too. Houdini works fine for practically everything I throw at it and is flexible enough for me to set up entire scenes as a base for others and have them understand what they’re looking at.
Naturally there’s other work absent from this 3D VFX Showreel, so take a look at the projects page for more.
In 2023 I was brought in to Rumble VFX as a lead 3D artist on Raw TV’s documentary series, Lost Cities Revealed.
Each episode covers a different location where up to date archaeological methods have revealed settlements to be larger and of greater importance than previously thought.
The VFX task was to create a big moment at the end of each of the six episodes, the current landscape altering to show how things may have looked in the heyday of each civilisation.
The Scottish episode focussed on Pictic Celts, a civilisation a few of us had experience recreating together for Britannia many moons ago. In a sense that made it easiest to make it look convincingly real. It probably helped I holidayed in the Highlands immediately prior to working on the series too! Little circular huts, wooden fences, fires, smoke, a suggestion of farming all helped to set the scene and give atmosphere.
Oman’s episode focusses on the first ever trade post at an oasis, an area of water-fed rich soil in an otherwise desert landscape. For this one I had to create buildings based on a few drawings and the excellent feedback from the director. The actual archaeologists on the ground had moved on to another project and didn’t have ready access to comms. Having made a generic square hut with a procedural redshift material for the mud walls, I laid out a city based on a map of the area, featuring irrigation and date palms.
Each episode came with a LiDar scan of the site, produced by industry specialists, Visual Skies. The Oman one really helped as the 2nd shot transpired to not be wide enough to fit in the oasis itself during the reveal. I replaced it with an entirely CG shot, recreating the camera move, only higher and wider.
As with all documentary work I’ve undertaken there’s a strong element of artistic license, be that in the layout of the cities, the overall look of buildings compared to each other or colours used by civilisations. In short, research is key when working on scientific or historical stuff, but where evidence is lacking, artistic expression helps.
The video above also contains shots from Sudan and Mexico.
Lost Cities Revealed is on Nat Geo and Disney Plus. I’ve done a lot of documentary work. To see more, take a look through the Projects page!
CGI – Computer Generated Imagery, as a term has always been an enigma. Personally I see it as being 3D graphics, but Wikipedia confusingly refers to it as including some 2D also.
VFX – Visual Effects, to many is synonymous with green screen. I’ve long suspected this belief comes from Behind The Scenes documentaries, vacuous DVD fillers that are so popular I do wonder if many people prefer so-called BTS content to actual movies and TV shows.
The VFX industry is so vast in scope that keying green screen (or any colour really) is one of dozens of things you could be asked to do within a week as a compositor. In itself, compositing is one of dozens of jobs in the business. However, very little compositing work is what many regard as CGI.
There! Right… there! You see it? That’s the grey area. If a viewer of a cinematic spectacle sees a hint of VFX they may well jump to thinking of it as CGI. Not all VFX contains CGI. Am I splitting hairs because I do 3D CGI and see CGI as 3D only? Yes. Yes I am.
When people say that show X has no CGI in, they might be right, or at least think they are. Lots of shows I work on have literally hundreds of VFX shots but only a dozen or so contain 3D graphic elements. The amount of VFX work in TV is astonishing. If you don’t notice it, it’s succeeded in being excellent.
To me, traditional 20th Century Hollywood was about in-camera practical effects and hand-painted backdrops. These days those are often, but not always, referred to as SFX – Special Effects. That historically has been used for so many things that now even VFX is lumped in with SFX in the media, to the extent awards are given out in the category of Special Visual Effects. Add in AI imagery and now nobody outside, or indeed inside, the VFX business has a clue what to do with all the acronyms.
The recent Barbenheimer furore made me think. Both Barbie and Oppenheimer contain a lot of VFX work – tonnes of it – but the directors’ favour of traditional methods was set upon by the media as a good thing, getting us all away from that pesky CGI. The CGI was never the issue. It was scriptwriting, acting, the terrible art direction, but most of all, a complete and utter misunderstanding of the whole VFX business and those who work within it.
To me, films and TV would improve a lot if the focus returned to making gripping stories with well-developed characters. Get that right, then speak to a VFX studio about what might work best as practical or VFX work. Read around the subject, talk to us VFX folk directly about what we’re doing, (and credit us if you would be so kind) but leave those misleading BTS docs alone. They aren’t made by those who made the effects.
To see the things I’ve worked on over the years and judge my qualifications for judginess, see Recent Work.
For me, there was a lot of set extension work to do including a recreation of the famous 90s neon signs at Piccadilly Circus. Naturally, being The Crown, there were also ground level, rooftop and aerial shots of Windsor Castle. I created a dilapidated look for Villa Windsor (Mohamed Al Fayed’s gift to The Queen) and was even called upon to replace an errant non-royal yacht. (How dare the late Steve Jobs leave it in shot!)
Work on the show took lots of hours of research and meticulous attention to detail, creating 3D in Houdini, projections in Photoshop, painting up in Substance Painter, rendering in Redshift.
A challenge for me is that I really enjoy the show and wanted to work on it for years, so ended up treating each shot as if it was my last. At one point I was dreaming of various tones of wall in the shots of Windsor Castle. What helped immensely and stopped me painting myself in to a corner was the exceptional production team whose feedback and documentation of the shoots was on point.
The yacht was a peculiar beast. Yachts are often very smooth, white, shiny, looking like fresh CGI frankly. With this being an HDR project I had to make sure we had details that were matching the plate, even out of the range of the SDR monitors most of us work with daily. When doing my rough comps I knocked the exposure of everything down to check it matched, then brought it up again.
One aspect of this project that really helped is the mountain of photos out there on the web. I’m really grateful for those of you who visited Piccadilly in the 90s with a camera or indeed the millions who’ve documented Windsor and the show’s Windsor, Burghley House over the years!
Set work is just one string to my bow – see other projects here.
After many years of work I’ve finally built up enough new shots to replace much of my old reel. It served me well, bringing in many projects, and indeed some of the better shots still remain, but now with spangly new work alongside!
My contribution to each shot is shown briefly in the bottom left of the screen, with a much more detailed explanation written shot by shot in the PDF breakdown.
In the past few years I’ve been fortunate enough to work on some very interesting projects that have been subject to watertight NDAs. Now that they’ve been broadcast and the dust has settled, it’s a real bonus for me to finally be able to share some of these with you.
The MARS series and Teletubbies were two such projects. MARS was seven months of my time and if I recall correctly, Teletubbies was significantly longer. This left two large projects missing from my reel and consequently any updates to it felt kinda pointless as I’d only be adding one or two shots and labelling it a new reel. The thing with working in TV or film is not all shots that I work on are actually showreel-worthy. Many are similar to each other or shots I’ve made previously, or they may be created using other people’s systems, to the point that putting them in a reel of my own work feels disingenuous.
This reel has been a long time coming, so I hope you enjoy it!
My last project before Christmas was at Seed Animation, somewhere I’d begun the year working on the surreal and hilarious Halwani Chicken commercial. This time around I was doing similar work on a P&O commercial, the style of which was to match a genuine stop-motion animation. As the client wished to see colour progressively spread through the world of our travelling couple, the choice to do this advert in 3d was made.
My input was as a layout guy and TD type. Layout is essentially placing things on screen in such a way that the eye feels comfortable when looking at the shots and is led to the correct area of interest. The TD (Technical Direction) input was mainly the unrolling paper effects seen throughout the animation.
Each strip of rolling paper was actually one long grid, flat by default, with a controller null at one end. A spiral curve was parented to that null and the grid deformed by that curve. As the null moved the spiral along the grid, an expression offset the position of the grid so it stayed put and the end unrolled. The grid was then extruded to give it thickness in its unrolled position, the new polygons kept in a separate cluster so they remained white, giving the impression of cut paper. As the operator stack remained live, the whole thing could be rolled back up, placed to suit the layout, then unrolled and deformed by a lattice to hug the surface it’s sat on. Having been animated, the whole thing was then converted to 2s so it mimicked the stop-motion 12fps standard.
Other inputs from me included the wobbly sellophane-like wake at the bottom of the ferry and the stones building up the castle in the background.
As with the Halwani commercial earlier in 2016, the whole project was rendered using Redshift 3D out of Softimage. Render times from Redshift still blow me away. It’s such a boon for small studios.
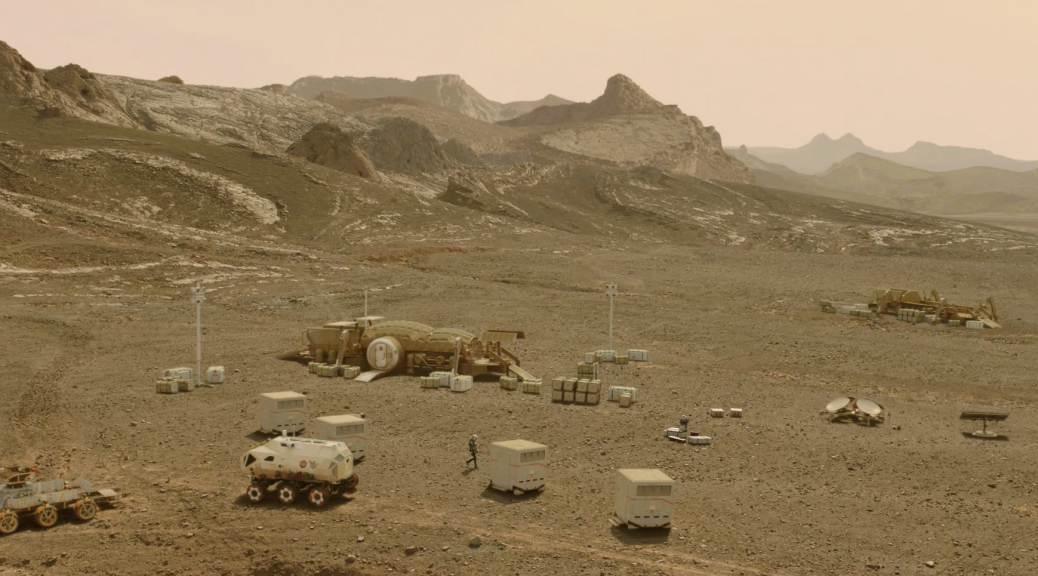
There’s a solid reason why I’ve not updated my blog lately! This is because I’ve been fortunate enough to be working continually since April at Framestore on Nat Geo’s new super series Mars! Woo!
I spent a fair amount of time as a Terragen guru. At least that’s what I was labelled when I joined. After a long stint of planetary artwork and huge cliff faces, both of which Terragen’s great for, I moved on to doing layout and lighting work in Maya. It was the first time I’d used a Linux install of Maya, let alone as part of a Shotgun pipeline so there were some wonderful learning curves at times, but it all paid off.
Framestore is the first of the large studios I’ve worked at and one that I used to dream about after seeing Walking With Dinosaurs all those years ago. It was a real privilege to work alongside amazingly talented people every day. Mars was a great project to work on and what I’ve seen of it so far is top notch. Catch it on Nat Geo or Sky Atlantic in the UK.
As the show is currently airing I am unable to show anything here… yet. Updates to come!
Recently I was fortunate enough to work with the guys at Seed Animation in Soho, London. As soon as I sat with owner Neil Kidney and watched the initial storyboarded animatic for what was to be a minute long Egyptian commercial for fast food chicken giants Halwani, I knew it was going to be an interesting month or so. Every shot was packed with details, loads of characters, and environments that at first glance seemed to all be different. With the addition of an Arabic song and fast cuts of shots that seemed to include a concentration camp and a swimming pool of frying oil, this project became something I doubt I’ll forget in a hurry.
My involvement was as one of 2 TD and lighting types, picking up from where someone else had left off, a position that can be a little tricky. Everybody approaches technical setups differently, so some adjustments were necessary. Animators were brought in to animate chickens, and others were off site modelling and setting up the fluid simulation for the swimming pool of boiling oil.
As this was a Softimage project, much of the technical side of this animation was created using ICE. My first task to conquer was the external landscape setup and layout, while my partner in TD crime, Ogi (Ognjen Vukovic) was busying himself with initial lighting setups and a feather system based on ICE strands.
The landscape setup was similar for every external shot. There is a large grid from which another higher res mesh is generated. That mesh has weight maps on which drive the distributions of grasses, stones, paths, and rocks, all of which are instantiated using scatter tools in ICE. The trees are a simple underlying mesh with a pointcloud of instanced leaves at the top. Bizarrely enough I was initially using a feather system, FC Feathers, for the leaves as it gave me great control over the overall flow, but that was junked in favour of a random distribution, bar on one of the designs, the pine tree, where it still works well.
Once we’d blocked out all the initial layouts, we started to combine every shot into something that could be lit nicely and render quickly. Each animated chicken was cached out from an animation scene using the Alembic .abc format, then imported into Softimage using a Python script Ogi had written that applied the animation from the Alembic cache onto the feathered chicken.
With the feathers in place, the grass, rocks, trees, flowers, distant hills and the myriad of fences and buildings were beginning to add up, a challenge for rendering anywhere, let alone Seed, a small studio with only a few full time staff and a proportionally sized render farm. The solution to this challenge was the truly remarkable Redshift 3D Renderer. This uses GPU rendering with Nvidia CUDA compatible cards. It’s fast. No. It’s really fast. With all the aforementioned details in shot, render times ranged from about 6 to 10 minutes per frame for most shots, including the time taken to send the scene to Redshift. That’s with reasonable sample settings, sometimes volumetric lighting, and at Full HD. We had a handful of PCs, mostly with two 980GTX cards fitted, though others had Quadros inside. Consider that… the power of thousands of pounds worth of CPU rendering hardware in a pair of gaming cards!
The only limit we found with such complicated scenes was RAM. Redshift uses the graphics RAM for its rendering, not only your PC’s RAM which is a major limitation if you only have a 4GB card for example. With so many geometry instances, feathers and other models in our scenes, it was actually system RAM which was a limiting issue and thereby scene extraction time too as the PCs were paging to the hard drive. The solution to this was to cache out the animated characters from the assembly scenes to Redshift proxy caches, then read them back in to a new scene and render from there.
Technicalities aside, lighting and set dressing was wonderfully straight forward and a joyous thing indeed. I have actually used Redshift before at Glassworks, just around the corner from Seed, but this was the first time I was lighting such complicated scenes with it. I recently returned to a studio where they were rendering using VRay and my old buddy Mental Ray. The latter in particular felt archaic, much more so than it ever has. I guess I held on to that one so long because of its tight integration with Softimage.
We’re all very pleased with the results on this ad. It was a brilliant team of exceptional talent. The animation especially helps, adding to the madness of such a quirky piece! Altogether now! Bwaaa! Cluck! Cla cla cluck!
Apparently an English dub is in the works…